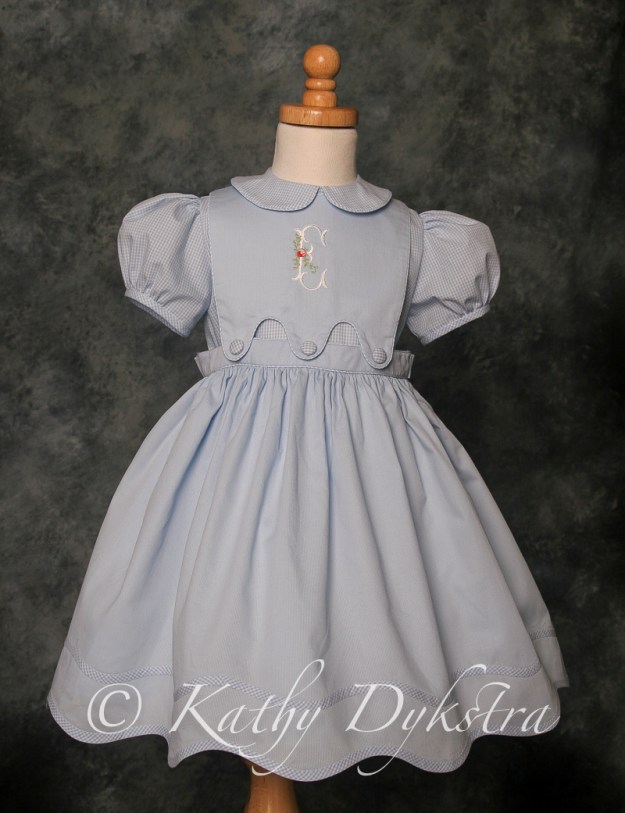
6 years ago I started my Etsy shop. I had made preemie outfits for a friend’s grandbabies (quadruplets) and had so many requests for the pattern that I decided to take the dive and sell that pattern and called it Prince/Princess Diaper Set. One pattern led to more, the second pattern being infant sizes of the same pattern.
Prince/Princess Diaper Set Pattern
Over the last 6 years, I’ve had requests (quite regularly) to extend the sizes up to 24 mo. I am happy to say that I’ve finally finished that task and have combined the extended sizes with both the Preemie pattern as well as the infant sizes previously offered. The newly revised pattern is still called Prince/Princess Diaper Set & Daygown and the sizes are Preemie (4 – 5 lb.) – 24 mo.
The instructions to make the top into a daygown are also included. I love the daygown length!
It was no small feat to update this pattern. When I created the first PDF pattern, I had very little knowledge on how to do it easily. It took a few years and a lot of research to get it right. Whew! But, to go back to the old files and turn them into new ones was quite the task. I had to do that before working on the larger sizes.
Of course, with the updated patterns, I felt I should also update the directions. While they are pretty much the same, I used a better format to create the instructions. So, overall, the entire pattern is improved! I hope my future customers will enjoy it!
On another note – I’ve also had requests to make my Sweet Cheeks smocked diaper cover in adult sizes. 😳 No worries – that won’t be happening. LOL! Summertime is the perfect time for these to be made and worn!!!
That’s the latest and the greatest from my design room!
I don’t know where the time has gone!!! I continue to stay busy sewing as well as creating new patterns. I’ve also been busy making lots of new Wee Care gown samples that I will use as samples in an upcoming workshop.
Since my last post, I’ve added 2 new patterns to my Etsy shop. The first one I just adore for summertime! It makes a gorgeous outfit for beach pictures, weddings, etc. It is perfect for the little ones, boy or girl, as well as older girls.
For little ones, bloomers can be used instead of a skirt, however, I loved the idea of creating both the bloomers as well as the skirt for a little girl!
The most recent pattern is my City Frock Dress/Tunic pattern. This is another fabulous pattern for summer sewing! Of course, it’s also suitable for cooler weather with a blouse or t-shirt underneath.
All the girls were a big fan of the large pockets! I had fun making these dresses & tunics!
Of course, I continue to make my Wee Care sets for Caleb Ministry. I have completed quite a few that I’ll be using as samples for an upcoming workshop. I did a variety of different hem treatments for the gowns.
The beautiful crocheted edging on this blanket and the next one was done by another friend, Maribeth, and sent to me. It almost makes me want to learn to crochet again!
Traveling up to Michigan to visit with my parents gave me plenty of time to get the gowns smocked! It’s a really long drive! I made sure that I had several gowns ready to smock before the trip!
For the boy gowns, I added a pleated sleeve version that I’m particularly fond of. Several years ago, another smocking friend of mine, Beth, made a gown with a pleated sleeve. She generously shared the instructions with our local guild. As the years progressed, I worked with the new Wee Care chair for the guild and we tweaked the instructions a bit more to end up with a sleeve that I do like for all the various sizes from the under 1 lb. size to a NB size. I have had requests for these instructions, so I’m adding them here for you to download. All the sizes are included in the PDF file.
I hope that these will be helpful to others that make these special gowns. I wish they weren’t needed, but if they can provide one less thing for bereaved parents to worry about, I’ll continue to make them.
I hope you’re having a fabulous spring, stitching beautiful things and getting ready for the summer months!!! Keep on stitching!!!
I sew quite frequently for preemie babies and because of that, I’ve created a number of preemie patterns which I sell in my Etsy shop (Kathysheirloomshop). You can click on the shop name and it will take you to my shop.
Recently I was contacted and asked about even smaller size preemie daygowns. I currently have my Prince/Princess Preemie Pattern available for a 4 – 5 lb. preemie.
By adding length to this top (I believe I added 8″ to the bottom of the 4 – 5 lb. size), it becomes a daygown rather than a diaper shirt.
The little bit of hand embroidery adds such a sweet touch to the gown and bonnet!
The person that had contacted me felt that a gown smaller than the 4 – 5 lb. size might be needed. Challenge accepted! LOL! I worked at making a smaller size pattern. I ended up with a 3 – 4 lb. size pattern. I did a test sew of the pattern and it worked out just as I expected. However, because the diaper shirt/gown is completely lined, the sleeves are sewn in last, meaning “in the round”. Sewing the sleeves into this tiny armhole opening was quite the challenge!!! I could only stitch about 5 – 6 stitches, then would have to reposition and repeat. 😱 I also ended up hand basting the sleeve into the armhole opening. It was just to fiddly to have to deal with pins while trying to stitch the sleeve in. 😳
I tried it on a 15″ baby doll “model”. This does make a sweet doll pattern as well!
Because of the difficulty/challenge to sew in the sleeves into the tiny armholes, I have decided to offer this as a free download. I was not prepared for the multitude of questions from buyers regarding the sleeve stitching! You cannot imagine how many messages I get as a seller!!! LOL! So, be aware, the tiny sleeves ARE a challenge, but they can be sewn with a LOT of patience!!!
The download is ONLY the pattern pieces, NO INSTRUCTIONS for sewing are included. If you have purchased the preemie pattern or the pattern for sizes NB – 12 mo., you can follow those instructions. If you want/need sewing instructions and have not purchased one of the patterns, you will need to purchase one of them in order to have sewing instructions.
If you want the diaper shirt to be daygown length, add 6″ to the bottom of the shirt.
As always, I still recommend soft fabrics (batiste, lawn, etc.) and if you choose to use a print, make sure it is a tiny print so that it doesn’t overwhelm the baby (or doll).
The bias has been prepared (see previous post) and the dress marked and is ready for the bias shaping and application. Start the application process at the center back of the dress. Using glass head pins, pin the bias to the skirt following the scallop shape and then shaping the loop area (see video). As you pin around the skirt, ensure that the outside edges of the bias are flat and smooth against the fabric.
The inside of the loops will need to be pulled in such that the bulk is distributed evenly. Thread a needle with a contrast thread and do a running stitch around the inside of the loop. Pull the thread so that the inside loop gathers in and will sit flat against the fabric. Then pin to secure.
When the beginning point is reached, cut off the excess spaghetti bias and tuck the cut end underneath the spaghetti bias loop to hide the cut ends (see video). With all the bias pinned in place, get the washable glue and glue underneath the bias to secure. Finger press the bias to the glue to secure. Carefully work around the skirt. To dry the glue more quickly, it can be pressed from the inside of the skirt using NO STEAM – only the dry iron.
Once the glue is dry, the bias is ready to stitch to the skirt. Decide if a decorative stitch will be used (blanket stitch, etc.) or if it will be straight stitched. Use 60 wt. thread, size 70 needle and an open toed foot. If using the blanket stitch, a 2.5 stitch length and a 1.0 – 1.5 stitch length is recommended.
Cut strips of Sulky Super Solvy and pin behind the area that will be stitched. Stitch around the inside and outside of the spaghetti bias with the stitch desired. Then soak the dress in cold water to remove any blue wash-out marker as well as the stabilizer and allow to dry.
The video showing the process can be viewed on YouTube. This technique can be used on so many different projects – pillowcases, tea towels, etc. Have fun trying this on your next project!
Happy Stitching,
Kathy
Disclosure: The recommended products contain affiliate links. If you purchase something through one of those links I may receive a small commission, so thank you for supporting me when you shop! These are my opinions and are not representative of the companies that create these products. These are the products I use and have gotten great results with. I would never recommend poor quality products.
Spaghetti bias is a great way to jazz up an outfit with very little expense. I’ll be sharing how to use spaghetti bias, how to create a design for a hem application as well as how to make your own spaghetti bias.
The above examples are my Bee-Utiful Pinafore pattern, available in my Etsy shop. It shows creative uses of spaghetti bias around the hem of the pinafore as well as using it as a leaf in the red/white pinafore.
Spaghetti bias was used above this hemline to create vines and leaves.
In the Suzette pattern, the spaghetti bias was used instead of a sleeve.
It can also be used to make bows as shown in the Sweet Cheeks Diaper Cover pattern.
To create the design for the hem, you will need to determine what sort of design is desired as well as how many repeats of the design will be done. Find the center front and center back of the skirt and mark with a blue wash-out marker. Then place the CF and CB on top of each other to find the side seams and mark them. You can view my fold and mark process on the YouTube video.
Create a template using paper, pencil and a curved ruler and draw in the type of curve desired. Cut out the curve and then place on top of the skirt and mark each of the scallop designs.
To create bias strips, find the exact bias on the fabric (45º angle from the selvages) and use a rotary cutter, ruler and mat to cut 1-1/8″ strips of bias. Join strips together to get the length needed to go around the skirt.
After strips are joined together, fold the strips with right sides together and sew along the length of the bias with an ACCURATE 1/4″ seam allowance using regular (40 wt.) all purpose sewing thread.
Using the Fasturn tool (see video for visual instructions) turn the spaghetti bias right side out. Let it rest for a bit to allow the bias to relax – it was stretched a bit while turning. Then lightly steam ensuring that the seam side is rolled slightly to one side of the bias. If the bias will be used only in a straight fashion, you can give it a hard press using press bars.
Part 2 for how to apply the bias strips will be coming soon!
Kathy
Disclosure: The recommended products contain affiliate links. If you purchase something through one of those links I may receive a small commission, so thank you for supporting me when you shop! These are my opinions and are not representative of the companies that create these products. These are the products I use and have gotten great results with. I would never recommend poor quality products.
The ultimate seamstress gift is a great pair of scissors. Gingher scissors are among my favorite and I have a nice collection of them – everything from the 8″ dressmaker shears to the 4″ designer embroidery scissors. The nice thing about the Gingher scissors is their customer service. I’ve had some of these scissors for many, many years, and have sent them back to Ginger regularly for service. Any Gingher scissors can be sent back to Gingher in Greensboro, NC along with a check for $15 and they will sharpen, oil & service them and they will be returned about a week later as good as new! (You can click on any of the links below to view the products mentioned.) Of course, the video presentation with explanations can be seen on YouTube!
If cutting has become difficult due to weaker hands or constant use, the 8″ spring action shears are a great choice.
7″ scissors sit next to my sewing machine, though some prefer to use the nippers next to their machines. Both work well.
Pinking shears aren’t a necessity, but they do come in handy for using as a seam finish for seams inside a wool jacket or something similar when you don’t want to overcast.
The tiny snips are wonderful for hanging around your neck for traveling – they are readily accessible.
The 4″ kindergarten scissors are also great for travel or for keeping in your lap while working on a project. The blunt ends are a much better choice than the embroidery scissors as they won’t pick you. I also use these exclusively for trimming fabric from behind lace. The blunt ends work well because you don’t end up with a pointed scissors end inadvertently catching a hole of the lace and cutting it accidentally.
A particularly lovely gift of scissors would be one from one of the designer scissors series that Gingher comes out with from time to time. The green print set is called “Sara” and I have the 8″ dressmaker shears as well as the 4″ embroidery shears. I also have the 5″ “Tessa” scissors. The designer series come out as a limited edition collection from time to time.
The other scissors that I really like is the Dovo scissors. These scissors have teeny, tiny serrated blades that grip the fabric so that it doesn’t slide away. My favorite set is the set of 3 gold-plated embroidery scissors (far left) that my husband gave me. ❤️ These are generally available at specialty heirloom shops.
Along with scissors, rotary cutters and self-healing mats are a great addition to the sewing room. I use both scissors as well as rotary cutters, depending on the project and my mood at the time. These also come in a variety of sizes. The smaller mats work well for small projects and for travel while a larger mat is wonderful to use on top of a cutting table. Mine is 36″ x 72″.
Rulers and measuring tapes are a necessity for any seamstress. Having a basic measuring tape in the sewing room, and then a retractable tape to carry around in my purse is always best. Then rulers, which there are a plethora to choose from, are wonderful to have as well. Heavier rulers like the 6″ x 24″ size work well to use with the rotary cutters. A lighter weight 2″ x 18″ ruler with a grid is also a necessity for me. Quilters will use a wider variety of rulers than someone that sews clothing.
Magnetic pin cushions have to be one of the best inventions ever!!! I have several in my sewing room – one next to the sewing machine, one on my cutting table, one next to my iron, etc. I like the ones with the cover because they work so well for traveling – even from room to room. Of course, spilled pins are a thing of the past with these! I also use glass head pins and not the pins that come with the cushions. You can iron over a glass head pin, but ironing over a pin with a plastic head can melt the plastic and cause havoc with a project.
Unfortunately, seam rippers are a necessity in the sewing room for those mistakes that happen from time to time. The Clover one is a brand that has a nice shape and sharp cutter. A seam ripper with a magnifier works well for those that need a little help seeing the tiny stitches.
If buying sewing notions for the seamstress is totally out of your comfort zone, hand creams are always a welcome choice. Keeping the hands soft is imperative so that fragile fabrics won’t snag on hang nails or callouses. I like to use Camille Beckman’s Glycerine Therapy at night and then use the Nutrogena Hand Cream throughout the day, supplementing with Earth Theraputics Cuticle and Nail cream as needed.
I hope that this has provided you with plenty of gift ideas for the seamstress in your life. You will never go wrong purchasing a quality item that will be well loved and used!!!
Kathy
Disclosure: The recommended products contain affiliate links. If you purchase something through one of those links I may receive a small commission, so thank you for supporting me when you shop! These are my opinions and are not representative of the companies that create these products. These are the products I use and have gotten great results with. I would never recommend poor quality products.
There are a couple different ways to gather lace for attaching to flat lace. Both render slightly different results. The top of a lace edging will have “header” threads. These are threads that can be pulled to gather up the lace. The majority of heirloom sewists will pull the top thread, which is generally the strongest thread, to gather the lace. This works, but can be a challenge when zigzagging to the flat lace or entredeux since there will be places where the lace wants to fold over and likely will be stitched in with that fold.
The other method is something that I learned when taking a class from Debbie Glenn, and that is to pull ALL the header laces. This results in gathered lace with the entire header thread being smooth and flat, much like a ribbon, and makes both the gathered lace look prettier (no folds or puckers) and is easier to stitch to the flat lace or entredeux.
The picture above shows the different results. The lace on top has only the top header thread pulled while the lace on thee bottom has all the header threads pulled. You can see how flat the header area is on the lower lace, making it so much easier to stitch the gathered lace to another lace. The top thread has gathers, but also has areas where the lace creates a fold/pucker that is difficult to work around and NOT get caught when stitching it to another lace.
To pull all the threads, begin by pulling the top thread, then locate another heavier thread and pull it, etc. There will likely be some very fine header threads, I tend to pull those in pairs (see video).
To join the gathered lace to another lace, use either 60 wt. Mettler thread or 80 wt. Aurifil or Madeira Cotona thread. The machine needle can be a 60 or 65 Schmetz Microtex needle if using the 80 wt. thread, or a 65 or 70 Schmetz Microtex needle if using thee 60 wt. thread. A universal needle can also be used.
For better viewing, it is advisable to use extra magnification. I like to use the Mag Eyes for this. The lens come in different strengths and it is easy to use especially if you already wear glasses. You can purchase extra lens in different strengths to use for different projects. I prefer to use the largest magnification to get the best results.
Set the machine to a zigzag stitch with a length of 1.0 and a width that is wide enough to encompass the header threads of both laces. You will likely need to hand crank the sewing machine to get the correct setting before starting to sew.
Be sure and give this a try – you will be glad that you did!
Kathy
Disclosure: The recommended products contain affiliate links. If you purchase something through one of those links I may receive a small commission, so thank you for supporting me when you shop! These are my opinions and are not representative of the companies that create these products. These are the products I use and have gotten great results with. I would never recommend poor quality products.
This simple tutorial goes along with my YouTube video about joining flat lace to flat lace. It’s a simple process. The first thing that you want to do is to starch the laces. I prefer to plan ahead and cut the lace lengths needed (cut about 2″ longer than what the finished length will be) and then place the lace in the bathtub on top of a white towel and starch – REAL starch, NOT Mary Ellen’s Best Press – them until they are dripping wet. Then I hang them over the shower bar to dry – it only takes about an hour and it keeps the iron from getting gunked up.
Once the laces have dried, give them a press. If pressing them makes them too soft to work with, repeat the process.
To join the laces, you will want to use lightweight thread & machine needles – Aurifil 80 weight thread or Mettler 60 weight thread can be used. With the 80 weight thread, a size 60/8 or 65/9 Microtex or Universal needle should be used. With the 60 weight thread, a 65/9 or 70/10 Microtex or universal needle should be used. The 60 weight can also be used for construction. The 80 weight is only for lace joining – it is not strong enough for construction
It is most helpful to use either an edge-joining foot or an open toed foot for joining laces. Try them out and see which one works best for you. Both can be seen in action on the video along with the end results.
When joining flat laces, set the machine to a zigzag stitch with a stitch length of 1.0 and a width wide enough that both header threads of the lace will be encased (shown in red).
If trying the different feet for this technique still results in difficulties, you can try using OESD Wash-Away Tape behind the lace. This will hold the lace in place as well as stabilize behind the laces for stitching. The end results will be slightly different than stitching without the stabilizer (seen on video), but if it is the way that you can make it work for you, then use it.
You can join as many laces together as needed for your fancy band. For more detailed French Machine Sewing techniques, I do have a book available (with bonnet pattern) in my Etsy shop.
I hope you’ll enjoy trying out some French Machine sewing!
Kathy
Disclosure: The recommended products contain affiliate links. If you purchase something through one of those links I may receive a small commission, so thank you for supporting me when you shop! These are my opinions and are not representative of the companies that create these products. These are the products I use and have gotten great results with. I would never recommend poor quality products.
I wanted to share with you some of the items in my stitching spot that have made my stitching so much easier and more enjoyable. Over the years, my eyes have “matured” and I have needed to accommodate that and make some adjustments. I suspect that there are others that may benefit from some of the same stitching “aides”.
My desire is to have a calm, peaceful and comfortable spot for stitching. Of course, it also needs to have excellent lighting as well as sufficient magnification for whatever project I may be working on.
My living room has wonderful lighting when the sun is shining. However, on cloudy days or in the early morning or late evening, the lighting isn’t sufficient for stitching. Needless to say, I don’t plan to slow down on my stitching projects, so, thanks to wonderful technology and sewing aides, I have been able to continue stitching along happily.
The first sewing aide that is used quite regularly is my magnification lamp. It is a floor model with adjustable arms and a swivel head. I purchased this many years ago when I was having difficulty with shadow work embroidery – getting back into the EXACT same hole with the needle. This exact model isn’t still available, but there are newer ones that are new, improved and will work fabulously for any seamstress!
These lamps for for magnification for handwork, but if magnification isn’t needed, but excellent light is required, these fit the bill – they can be adjusted to be overhead. The ability to wheel this lamp from room to room makes it a wonderful choice for anyone! I love the clean white color, but it seems silly of me to buy yet another one just for a different color. 😜
Floor lamp with magnification Of course, there are many models at different price points – just make sure that what you are looking at has enough magnification and lighting for your needs!
The next item that is invaluable to me is actually 2 items – my Ipad Pro and the stand for it! I have linked to both of these, but if you already own an Ipad or tablet, just make sure that the stand will accommodate the size that is needed. It is wonderful to have the adjustable stand and the gooseneck allows it to flex forward any way that is needed for optimal viewing.
The Ipad is wonderful! The ability to zoom in closely in order to see stitches as large as needed!!! I use this all the time for smocking picture smocking designs. I also like the fact that the lighting/brightness can be adjusted – I keep it set higher than average so that there is plenty of contrast.
Of course, no room is complete without music – at least, not as far as I’m concerned. I have 2 fabulous Sonos speakers that provide whatever type of music I’m in the mood for at the time. They connect to Pandora, my own music library, etc. Having a husband that loves technology and loves a good sound system is a real bonus!!! I have a pair of these in my sewing room as well.
Then there are the stitching necessities – the sewing caddy, a pattern that I sell in my Etsy shop, is always with me when I’m stitching. I carry it from room to room and it holds my scissors, pins, needles, rulers, marking tools, etc.
The current project I’m smocking uses beads, which make any project so elegant! I have the most wonderful way to manage the beads while smocking. I have a gift card tin that I have fitted with a tacky mat. The beads stay put until you remove them – even if you drop the tin!!!
This little tin works great for carrying your work around from room to room or even for traveling since the beads stay stuck to the mat. This was one of my best finds in recent years! Of course, smocking with beads requires a milliner needle. I found that the size 8 milliner needles worked best with 3 strands of floss and the size 11 beads.
When smocking with beads, you want to add the bead when you meet up with the final pass on a smocking design. So, in the picture below, the cable row was smocked first, then the 2-step trellis. When the trellis stitch meets the cable row, add a bead there. The bead at the lower point of the trellis will be added on the next row of smocking.
This bonnet matches the Wee Care gown that I finished recently. I will share the smocking design for you to download.
Be sure to pleat half rows for these tiny Wee Care gowns! I used DMC#818 for this gown. The video for this post can be viewed on YouTube.
Happy Stitching!
Kathy
Disclosure: The recommended products contain affiliate links. If you purchase something through one of those links I may receive a small commission, so thank you for supporting me when you shop! These are my opinions and are not representative of the companies that create these products. These are the products I use and have gotten great results with. I would never recommend poor quality products.
This segment of the sew-along will cover putting on the bias band, tying off for smocking and then designing the scallop hem design.
Before attaching the bias band, finish the backs of the gowns. It is recommended that you turn in a narrow hem that is approximately 1/4″ finished – wide enough to sew a snap onto. Next, count pleats between the front armhole seams to find the center of the gown and mark the center with a blue wash-out marker.
Cut bias band 1-1/8″ wide and about 1-1/2″ longer than needed. Mark the band at each end with the finished neckband size and also mark the middle of the band.
With right side facing up, tie a knot in the top 2 pleating threads. Pull the knot to the fabric. Pin the bias band (right sides together) at each end and at the center.
Sew the bias band to the gown with a basting stitch (see video). The stitching line should be between the top 2 pleating threads. If it needs any adjusting, fix and re-baste. Then sew on top of the basting thread with a 2.0 stitch length. Stitch again a scant 1/4″ away from the first stitching line. Cut away excess fabric at the second stitching line.
Fold the bias band to finish the neckline (see video), trimming the bias band if needed.
To create the scalloped hem, measure across the width of the gown at the hem. Cut a length of freezer paper the same length as the width of the gown hem. The length can then be cut into 6″ wide strips so that you can practice with 3 strips of freezer paper as you design the hem.
Fold the freezer paper in half to find the center, then fold in half again – those folds represent the side seam of the gown. Watch the video to see how simple it is to create pretty scallops.
Stay tuned for the next lesson, which will be the Madeira hem application. This can be done with a sewing machine that has a pin-stitch or a second method that doesn’t require a pin-stitch will also be shown – that one requires a double hem-stitch needle. Be sure to have your supplies ready for this segment. You will need a blue wash-out marker, water soluble thread, water soluble stabilizer, #110 needle, #80 weight thread, and the kindergarten scissors (optional, but very helpful).
Enjoy putting on the bias band and designing your unique hem scallop!!!
Kathy
Disclosure: The recommended products contain affiliate links. If you purchase something through one of those links I may receive a small commission, so thank you for supporting me when you shop! These are my opinions and are not representative of the companies that create these products. These are the products I use and have gotten great results with. I would never recommend poor quality products.