Monthly Archives: November 2014

Christmas Elf and pattern review

I’ve finished up my last Christmas dress.  Sadly, it’s not exactly what I had expected.  I hate when that happens!  I thought I’d write-up a review of the pattern so that nobody else will have the same experience.

With Christmas fast approaching, I had to get the dress done quickly.  Wanting a dress that wasn’t quite so traditional, I chose the same dress that I had designed for Australian Smocking and Embroidery – a basic yoke dress with a lowered neckline and no collar.  That dress fits my granddaughter perfectly right now, so it was an easy choice for me to make.

This dress was featured in Australian Smocking & Embroidery magazine, Issue #88 (Red Birds).  I designed the dress, sent the pattern pieces along with the dress in to the magazine and the dress pattern is in the pull out section of the magazine.  Obviously, they had their own model and photographer.  I love this dress on Ella – love the neckline, sleeve length and, well, pretty much everything about it.  Could this be any cuter on Ella!?!?!?  Such a great fit as well!

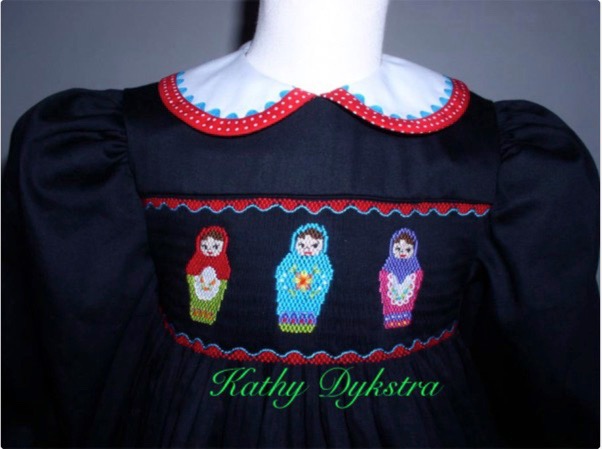
Because of all my recent sewing, the room was trashed filled with creative inspiration, so I chose to pull out the magazine and trace off the pattern rather than find my originally submitted pattern.  I traced off the size 4 (same size I sent in) and proceeded with the sewing – I was on a mission to get it done.  It wasn’t until after the bodice was entirely finished and I was pressing the neckline that I noticed that it seemed smaller.  I wasn’t going to deconstruct and re-sew the whole bodice, so I decided that it would just have a closer neckline, though I wasn’t happy about the change.  They say a picture is worth a thousand words, so here’s the Christmas dress.

The neckline is significantly higher and the dress is larger.  I should have known that the dress sizing would be larger – the AS&E patterns are always  more generous in fit.  A size 3 would have been a better choice for that.  I take full responsibility for that mistake.  However, the totally different neckline is inexcusable as far as I’m concerned.

The magazine features the yellow dress, so one would expect to get a dress with an open neckline, and not a close-fitting neckline.  It is the editor’s choice to make changes, but when you change the “lines” of a pattern but then show a dress that does not reflect the changes and no mention is made of the changes – aka:  “we have chosen to give the dress a higher neckline than the modeled garment” – that hits a nerve with me.  I thought I was sewing the same dress and clearly it isn’t the same.  Needless to say, I’m disappointed.  I suspect anyone else that has made this pattern has had the same experience.

Seamstress beware – this is not the dress you’ll be getting in the magazine pull-out.  If you want this neckline, you need to trim away at least 1/4″ – 3/8″ all around.

On the positive side, I love Janet’s new smocking plate!  The elves are adorable!!!  Ella was ecstatic about “Elfie” as she calls him.  Another positive is that I made the dress long enough – it will fit again next year.  As cute as Ella is, I’m sure that the generous fit won’t be noticed by too many that will be seeing her.  :)  Also, observers will be unaware of the fact that I had hoped for a lower neckline.  LOL!  So, really, it’s only me that is bothered by this.

My other “fail” for the day was a pair of pants for Ella.  I measured her at the end of September for pants length, so thought I had that made as well.  Wrong again.  She’s grown!  The pants are too short.  Oy!!!  Back to the drawing board.  Unfortunately, I have a second pair of too short pants cut out.  LOL!  Some days are just like that!

My suggestion of the day – rush over to Janet’s website and get her Elf plate and have some fun smocking.  The pull out a tried and true pattern and sew it up for Christmas!  You can bet that’s what I’ll be doing for Easter dresses!!!

Happy stitching!!!

Kathy

This entry was posted in picture smocked dress on .

Designing a Dip Front Picture Smocked Bishop – tutorial and free design

My latest Christmas bishop dress has stirred up a lot of interest and questions from fellow smockers.  It’s no secret that I love picture smocking!  I also love bishop dresses.  My favorite bishop dresses are the ones that combine picture smocking with a dip in the front.  That allows for a nice, big picture smocked design without interfering with the integrity of the fit of the bishop.

I thought I’d share the methods that work for me when I choose to add a picture smocked design to a bishop dress.  There’s no “one” way to do this, rather, the geometric design and flow has to be something that works with the picture smocking design that has been chosen.  Sometimes a couple attempts are needed before the desired look is achieved.

First and foremost, I always construct my bishop dress prior to smocking.  This is particularly important when choosing to do a picture smocking design as it allows you to visualize the pleats and their “spread” while you’re working on it.  This helps to reduce the possibility of smocking too tightly for a bishop.  Obviously, you have to have an idea of what you’re going to smock (aka: how many rows to pleat) before you construct.

As you might expect, you will need to backsmock behind the picture area as well as around any unsmocked areas around the neckline. This is another reason that making the dress up prior to smocking is helpful. I generally do my backsmocking with a cable stitch (shadows of these cable stitches can be seen from the front as with any picture smocked design), but a wave stitch or trellis can also be used and can create an interesting background shadow.

If the idea of having so many rows all around your dress causes you stress, you can always use the seamless bishop pleating method that Martha has written a tutorial on and just have the additional rows in the front of the dress design.  If you choose to use this method, I’d probably add an additional row (more than the suggested amount from the pattern) to the sleeve pieces, just to make sure that you’ll be able to do the necessary ascent when you get to that point in the smocking.

As you will be able to see with most of the pictures shown in this post, most of the ascending stitches will involve several trellis stitches up (4 – 8+), then a break with 2 – 4 cable stitches, then repeat of the trellis upwards, cables, etc. until you reach the spot where you want to continue and finish around the neckline.  If no other figures or picture smocking will be done, you can go up to where you’ve only got a couple rows smocked around the neckline.  Of course, with larger sizes, you’d probably want to have a few more rows smocked than with smaller sizes.

For this Christmas design, I chose to descend and ascend around the ornament in a repeated sequence.  That is not always the way that I choose to do it, but it worked well for this one.  The 3 closely smocked outline is done in a way that made me think of candy canes.   I thought I’d share the smocking graph with you in case this is something that you’d like to try and you don’t want to “think”.  :)  The only element that I couldn’t successfully graph was the outline stitch that was done in white floss around the neckline row of rick rack.  Stitch that as closely as possible to the red.

Once the bishop dress is constructed, I smock the main picture first.  After I “see” how this fills the area, then I decide what or if I will add any other picture smocking designs around the remainder of the bishop dress, or if it will just have a few rows of geometric smocking.  Each design is unique.

Because of the shape of this mouse/candy cane, a row of cable stitches were used across the lower edge of this bishop dress.  As soon as it was possible to begin the upward stitching (determined by the lowest edge of the candy cane), a similar upward design was done.  No additional picture smocking designs were added around the dress.

For the Santa design, the lower edge has trellis stitches underneath the Santa, then a slight ascent begins and a few trees were added around the dress.  The geometric borders on this design are done in white and very subtle.  I felt a bright red border would not look pretty on this fancy dress.

This summer dress featured one large apple and worms around the neckline.  The border was kept simple due to the busyness of the print and smocking designs.  Just a few cable stitches at the bottom of the apple were needed before the sharp ascent upwards.

This is another example of a large design that required cable stitches at the bottom and then a steep trellis upwards with narrow breaks of 2 cable stitches.  Again, no other picture smocking designs were needed around the neckline.

This dress is a variation of the bishop dress that was featured in one of the Australian Smocking and Embroidery magazines.  The larger flower was chosen for the center front, but then smaller flowers around the neckline.  This design does not have as sharp an ascent upwards and was more determined by the shape of the diamonds in the background smocking.  I liked this design so well that I smocked it a couple times!  LOL!

This was one of my more unusual dip front designs.  A pink Cinderella and her silver shoe (barely shows up to the right of the girl).  This was not a favorite of mine, but my client loved it.

This design was definitely one of my favorite ones!  I was able to keep the geometric design underneath the snails, but then ascend upwards and just had a few random butterflies stitched around the remainder of the bishop.

Sorry this is a bit difficult to see with the watermark placement, but the frog also has cable stitches underneath and then it ascends to a point where there’s just a small bit of smocking around the remainder of the bishop.

This was another set that I loved.  The dress maintains a geometric trellis design that continues the up/down design that we’re accustomed to seeing on a bishop.  The difference is that you to up maybe 4 trellis stitches, then down only 2.  This gives a nice, gentle ascent to the design.

This was another favorite dress for a little girl’s first birthday.  This also has a gentle ascent marked by several trellis stitches up, a few cable stitches, more trellis stitches up, but not too far up to leave room for the birthday balloons.

The same method can be used for geometric designs and is equally pretty.  I won’t add descriptions, but will let the pictures speak for themselves.

In the end, you’re the designer.  Don’t be afraid to try something new.  If you get your picture smocked and your first attempt to surround it with your own “dip” design isn’t a success, take the stitches out and try again.  It is easiest to start the dip design from the center front and work your way around one side.  Then turn the dress upside down and do a mirror image of the design on the other half of the dress.  These are so fun to create and will get you thinking out of the box.  Have some fun with it!!!

As always, keep on stitching!!!

Kathy

This entry was posted in picture smocked dress on .

Christmas Sewing – A Bishop Dress

With only a few weeks until Christmas, and fewer weeks until the little ones can start wearingChristmas outfits, I had to get busy with sewing!  I had already made an outfit for Liam, prior to his birth – and I’m still hoping that this one will fit at the right time.  He’s growing like a weed.

I used the same fabric to make a bishop dress for his big sister, Livvy.  I just love this tiny micro-check fabric!  I knew that I wanted to picture smock for her dress as well, and I love to have the smocking dip down in the front.

Won’t they look cute together!

For her smocking design, I chose several different smocking plates and then did my own “thing”.  :)

The center ornament is taken from Cherished Stitches “Joy” smocking plate.   I thought it needed a bow on top and tried out a ribbon bow, but wasn’t happy with the way it looked.  Perhaps it’s because I tie a pitiful bow!  LOL!  So, I used the bow from Ellen McCarn‘s “Classic Bow”.

With the center design finished, and my outside smocking completed (I did my own thing to create the geometric design that dips), there was the problem of all that blank space around the ornament and in the back.  What to do…..

I solved the problem of the blank area by using some of the holly designs from Ellen McCarn’s“Victorian Bow and Flowerettes”.   The holly designs extend around the back of the dress and stop at the button placket.  I always make my bishop dresses with button backs.  My experience has been that the snap options that most patterns suggest  have never stayed fastened on any moving children.

Finally, the neckline border is one that I designed and used in my first published design for Sew Beautiful magazine.  It is rather labor intensive, but I love the results.

So, I have one dress finished and one more to go!  I can do this!!!  The next dress will be one with the new smocking design from Janet Gilbert – I loved her new Elf design and knew that I had to use it for Ella’s Christmas dress.  I feel sure that you’re going to need this design as well!!!

Hopefully you’ll see a cute rendition of this smocking design in next week’s post!  How’s your Christmas smocking coming along???

Keep on stitching!

Kathy

This entry was posted in picture smocked dress on .