Category Archives: tutorial

Piping Possibilities

Piping is a wonderful way to add designer detail to a garment. Here we will review different ways to apply piping to the garment, getting the best results possible. As with many techniques, there are multiple ways to accomplish this.

Piping always works best if it is cut on the bias. In a pinch, if the piping is being applied to a straight seam, a straight piece of fabric can be used to cover the cording. However, piping will always have a smoother look if covered with a bias piece of fabric. Going around curves requires that the piping be covered with a bias strip of fabric.

Let’s start at the beginning – making the piping.

The bias on a piece of fabric is at a 45º angle from the selvage. The selvage can be folded over at the 45º angle and a rotary cutter and ruler used to cut strips of bias. This gives the most accurate strips of bias to use.

Frequently long strips of bias are needed so it will be necessary to join bias strips together to get the desired length.

To join bias strips, place 2 strips with right sides together and the cut ends matched up. Stitch across the corner at a 45º angle (shown in red). Trim the seam allowance and press the seam open. Join as many strips as needed in this manner.

To make the piping, place the cording on the wrong side of the bias strip and wrap the bias around the cording, matching the cut edges. Stitch close to the cording using an edgestitching or piping foot and use a slightly longer stitch length (3.0).

Do NOT stitch as close as possible!!! When the piping is applied to the garment, it should be stitched 1 thread closer to the cording than the stitching used to create the piping. This way the stitching for the piping will always be enclosed and won’t show on the outside of the garment.

Applying The Piping To The Garment

Now that the piping has been made, it can be applied to the garment. There are always different ways to end piping. One is not right while the other is wrong, they are just different. We will explore a few different methods here. Try the different methods to see which on works best for you.

When piping is going to go around the bottom of a sleeve or at the top of a sleeve cuff, it needs to give the appearance of being continuous. Again, there are several different ways that this can be accomplished. As previously mentioned, when the piping is stitched to the garment, stitch a thread closer to the cording in order to cover the stitching line that was created when the piping was made. If a lining is involved, when the lining is sewn, again, stitch 1 thread closer to the cording.

This second stitching line isn’t shown in the diagrams in order to keep the diagrams crisp and uncluttered.

The first 2 methods involve overlapping or butting the ends of the piping.

In both of these methods, the cording remains in the piping and the piping is either crossed over each other or the ends of the piping are butted together. To butt the ends together, it is helpful to use a hemostat to grab the end of the piping and get a good angle as it is stitched to the garment, as shown in the example on the right. Always check to be sure that there is a smooth and continuous flow where the piping is showing!

Another method involves angling off the fabric. This is similar to butting the ends together, however with this method, the cording is removed from the section of the piping that will be angled off. This method reduces bulk in the seam allowance of the garment.

To remove the cording from inside the piping, pull out a small amount of cording at the beginning, where the piping will be applied. Cut off the cording, then ease the cording back into the piping. Fold over the area that has no cording in it at a sharp angle and stitch the piping down. End in the same manner, removing the cording from the section that will be folded down. Ensure that there is no gap left between the beginning and the end of the piping!

The next 2 methods involve encasing the cording inside the piping for an unbroken appearance.

Method 1 Encased – Begin sewing piping 1” away from the end, continue around and stop before you reach the starting point. Remove a section of cording (about 3/4”) from the starting end.

Fold the cut end down at a 45º angle until it meets the cut end at the lower edge.

Take the opposite end of the piping and place it over the folded edge of the bias. Cut it off at the exact spot where the cording ends on the opposite side. Wrap the bias band over the cording and stitch. This leaves the piping with an angled seam, which disperses some of the bulk at the seam.

Method 2 Encased – Begin sewing the piping to the garment, starting about 1” away from the cut end. At each of the ends, overlap (without stitching) the ends by 1/2”.

Cut off 1/4” of the cording from each side.

Fold under 1/4” of the bias strip on each side, wrong sides together, encasing the end of the cording. Press. Then fold over the the bias strip so that the cut edges meet.

The finished bias band has ends that butt up to each other. Ensure that there is no “gap” between the sides.

.

Some of the same methods can be used when the piping ends at a foldline (such as at the neckline or waistline of the back of a back buttoning blouse or dress). The ends can be angled off, as shown in the first methods. Alternately, the ends can be encased using either of the encased cording methods. Both work well and will give good results.

As with all techniques, practice makes perfect! Enjoy the process!!! Happy stitching!!!
Pressing Gifts For The Seamstress

Since Easter has come and gone, the next significant holiday (for me anyway!) is Mother’s Day. I thought I’d offer some ideas for Mother’s day gift giving for those that need some help in this department.

I know I’ve already done a blog post about pressing tools, but this post compliments my YouTube video on pressing gifts for the seamstress. So often friends/family don’t know what to get for a gift, saying that I’m difficult to buy for. You may have the same situation. Well, after years of accumulating wonderful notions & pressing aides, I thought I’d share some with my YouTube watchers and blog readers in case you don’t have some of these and think you’d want them. You can share this blog post or the YouTube video with them and let them know all the wonderful things available. You may not even realize that you “need” some of these!!! LOL!

I have shared my 3 pressing units – my Rowenta Steam Generator Iron, which I absolutely LOVE!!! If I could only have one of the 3, this would be it. Also my Singer Press, which works so well for pressing lengths of fabric but also is especially wonderful for applying iron-on interfacings and/or foam to tote bags, purses & travel bags. The 3rd is my Rowenta Steamer – this is great for quick touch up jobs so that you don’t look like you slept in your clothes!

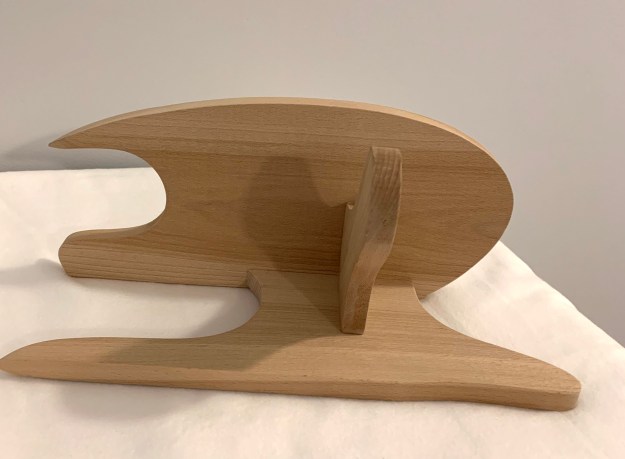
Various other tools for pressing, such as all the wood tools (clapper, pointer/clapper, tailor board & seam stick) are a must for me to get a good press on difficult seams. Of course, I wouldn’t be without a ham or sleeve roll. Sometimes you just need that for the perfect press – especially on the roll collars, as shown in the video. I couldn’t do without the ham holder for collar pressing!

So, if you have someone that has difficulty finding just the right gift for you, these ideas should really help out and get you something that you’ll love using rather than some random gift that gets put away and never used. All different price points are covered, so there’s something for everyone! You can thank me later!!!

Links to products mentioned:
June Tailor Cut N Press

Pressing Ham

Sleeve Roll

Clapper

Ham Holder

Point Press Clapper

Tailor Press

Rowenta Steamer

Rowenta Steam Generator Iron

Singer Press

Finger Guards

Press Cloth

Rajah Press Cloth

Sleeve Board

Wide Ironing Board

Stainless Lab Spatula

Quilter’s Bias Bars

Seam Stick

A few other tools that I forgot to mention but are also great to have:

Teflon Press Cloth

Clover Mini Iron

Dritz Hem Gauge

Disclosure: The recommended products contain affiliate links. If you purchase something through one of those links I may receive a small commission, so thank you for supporting me when you shop! These are my opinions and are not representative of the companies that create these products. These are the products I use and have gotten great results with. I would never recommend poor quality products.

GET CREATIVE – WALKING THROUGH THE DESIGN PROCESS

My design process is pretty simple, but involve auditioning LOTS of different fabric choices as well as ribbons, rickrack, trims, piping, etc. In the YouTube video I show many different design options that were auditioned for this dress.

After choosing the pattern and base fabric, other co-ordinating fabrics are pulled to see which ones speak to me at the time as well as observing which ones seem to look the best and “pop” with the main fabric.

For this dress, I chose the Children’s Corner “April” pattern.

If you haven’t used Children’s Corner patterns before, these are great patterns to use. They are drafted well, have great instructions and fit well. It may be a challenge to use the 1/4″ seam allowance. If that is the case for you, you can always add to the seam allowance until you have a seam allowance that you’re comfortable with. When doing this, it is nice to use some seam allowance rulers. I prefer the 3/8″ size. You can see how to use the ruler on the video. You can also purchase sets of rulers with additional sizes included (1/2″, 5/8″). These work great if you are drafting patterns or making significant changes and need to add seam allowances.

Sometimes I will start by taking a picture or screenshot of the line drawing of the pattern and then will print the picture. This allows for a blank canvas to add details and color in.

Once a general idea for design has been sketched over the line drawing, then I pull out the matching trims, etc. and begin the audition process (see video).

Because I wanted a fuller skirt, I used a 42″ width rather than the width suggested in the pattern for both the skirt front and back on the size 5 & 7 that I made.

Play with different ribbons, trims, buttons, rickrack, etc. to see what works for what you have in mind. With the floral dress, I had difficulty finding matching trims. Lavenders are a hard color to match, so I made a fabric ruffle.

Also, if you want to use buttons and don’t have a good match, covered buttons work well. Rather than bows, yo-yo flowers or fabric flowers are another good choice.

I hope that you will find this process helpful for you as you plan your next outfit!

Happy designing and sewing!!!

Kathy

Disclosure: The recommended products contain affiliate links. If you purchase something through one of those links I may receive a small commission, so thank you for supporting me when you shop! These are my opinions and are not representative of the companies that create these products. These are the products I use and have gotten great results with. I would never recommend poor quality products.

Heirloom Sewing 101 – Sewing Flat Lace To Fabric

Working with heirloom laces is easier than you think. For these instructions and the corresponding video, I will be working with the Tapered Smocked Preemie Bonnet by Laurie Anderson. If you are a Facebook member of the SAGA Wee Care group, she has generously donated this bonnet pattern to the group and it can be downloaded there. I am making this bonnet to match one of the Wee Care gowns completed in a previous video.

For this technique, I am using Imperial batiste, heirloom lace, 60 wt. thread, sz. 70 Microtex needle & Faultless spray starch.

After cutting out the pattern and pleating, per the instructions, flatten out the bonnet in order to attach the lace. Pull one of the header threads of the lace in order to go around the curves, as shown on the video.

Place the lace 1/8″ from the edge of the bonnet front, with the scalloped edge of the lace facing towards the bonnet (right sides together). Set the straight stitch of the machine to a 2,0 length and stitch the lace to the bonnet, stitching on top of the header threads. Go around the corners carefully, ensuring that the gathered portion of the lace isn’t caught in the stitching.

After the lace is attached, switch to a zigzag stitch (4.0 W & 1.0 L) and zigzag the seam allowance of the lace to “roll & whip” the seam, which will give it a nice finish. The left swing of the needle should be on top of the header lace/stitching line and the right swing of the needle should go off the fabric.

Once the roll & whip has been completed, finger press the seam allowance towards the fabric and then change the zigzag stitch to a 1.5 W & 1.0 L. Stitch this zigzag stitch on top of the lace with the left swing of the needle going through the bonnet fabric & seam allowance and the right swing of the needle barely going into the lace. This keeps the seam allowance from flipping forward and showing through behind the lace. While this is an optional step, I always do it to keep the lace in place.

All of these steps are shown in the video, so you can refer to that to see the steps completed.

I hope that this will help you in your quest to learn more heirloom sewing techniques!

Happy Stitching!!!

Kathy

Links to some of the supplies mentioned:

Imperial batiste

60 wt. Mettler thread

Size 70 Schmetz Microtex Needle

Starch

Disclosure: The recommended products contain affiliate links. If you purchase something through one of those links I may receive a small commission, so thank you for supporting me when you shop! These are my opinions and are not representative of the companies that create these products. These are the products I use and have gotten great results with. I would never recommend poor quality products.

Machine Granitos

Machine granitos are simple to make and can be finished much more quickly than hand-stitched granitos. To prepare for stitching the granito, use a circle template and a blue wash out marker to draw the circles where they are to be stitched on the fabric.

Cut a small piece of Totally Stable stabilizer and iron it to the fabric behind the drawn ccircle.

Thread the machine (top and bobbin) with 50 wt. DMC cotton thread in the color desired and use a size 70 Schmetz needle and an open toed foot. Set the machine for a .3 – .5 stitch length.

Take 1 stitch in the center of the circle. Gently pull on the top thread so that the bobbin thread comes to the top and pull it through. Holding both threads, take a couple stitches to secure the threads, then trim away the tails next to the fabric.

Set the machine to a zigazag stitch with a stitch width of 1.5 and a stitch length of .2. Stitch 12 – 20 stitches. Be sure to count the stitches! Stitch the same number of stitches forward, then backward, then forward again and backward again. This completes the machine stitching. For the granito stitched in the video, I stitched 13 stitches.

Gently pull on the bobbin thread until the top thread comes to the back. Tie a square knot to secure the threads. I generally will tie 3 knots.

With your thumbnail, push back and forth a few times on the wrong side of the granito to push the threads towards the front. Then pull away the stabilizer. Your granito is complete!

If the granito doesn’t look completely round, the shape can be pinched between finger nails to help round it out (see video).

Granitos are a lovely way to add visual interest to garments, pillowcases, doilies, etc. Have fun stitch some!!!

Kathy

Supplies needed:

Circle Template

Fine Tip Blue Wash Out Marker

Totally Stable Stabilizer

Schmetz sz. 70 Microtex needle

DMC 50 wt. Cotton Thread

Disclosure: The recommended products contain affiliate links. If you purchase something through one of those links I may receive a small commission, so thank you for supporting me when you shop! These are my opinions and are not representative of the companies that create these products. These are the products I use and have gotten great results with. I would never recommend poor quality products.

Wee Care Sew-Along 4 – Madeira or Alternate Hem Treatment

In this sew-along we will be finishing up the gown by doing the Madeira hem or alternate hem.

First, I have to apologize as I’ve created a minor problem with the construction. For the original gown, I sewed the sleeves, inserted them into the gown, pleated the gown, did the hem treatment and finished with finishing the back of the gown and attaching the bias band. It seemed to me that it made more sense to do the hem last, as is done on most dress/gown projects. Obviously, I didn’t consider the full implications of changing the construction order. 🙄

To create the Madeira or alternate hem treatment, the back of the gown needs to be unfinished. So, for those that have finished the back of the gown already, you will need to remove the stitching in the hem area so that the Madeira hem can be sewn. I’m sorry for the un-stitching required, but thankfully, it’s a small amount. You will also need to add that hem allowance to each side of the pattern piece that you’ve created so that the contrast band pattern and fabric will be the same width as the unfinished gown.

The first step will be to cut 2 contrast bands of fabric, at least 1″ deeper than the highest point of the hem pattern created and as wide as the gown. Starch the bands as well as the skirt fabric. Then place the scallop pattern of your choice on top of one of the contrast bands, and trace around the scallop shapes with a blue wash-out marker.

Place the 2 contrast bands with right sides together and pin to secure. Put the water soluble thread on the sewing machine (top only) and stitch along the blue lines with a 2.0 stitch length. Be sure to take one diagonal stitch across each scallop peak before continuing stitching along the scallops. The diagonal stitch will result in a better looking point at the peak. Accuracy is essential – the way that the scallops are stitched now will be the way that they look on the finished garment.

After stitching the scallops, trim away the excess fabric from above the stitching line with an even seam allowance. Clip across the point. Then clip the seam allowance of the curves at 1/4″ intervals.

Turn seam allowance to the back (see video) on each side of the point, insert the long tweezers, pinching the folded seam allowances, and turn the point/fabric right side out. Press with a dry (NO STEAM) iron. Do this along the length of the contrast band until all points are turned and pressed. Ensure that you are satisfied with the points along the band, if not, make any adjustments.

IT IS HIGHLY RECOMMENDED THAT THIS TECHNIQUE IS PRACTICED ON SCRAP FABRIC PRIOR TO WORKING ON THE CONTRAST BAND!!! Use some of the leftover fabric from the project to try the techniques and then save the practice piece to practice the pinstitching on.

Place a damp linen press cloth on top of the fabric and press until COMPLETELY dry. Once it is completely dry, the 2 layers can be separated easily. If some places are still stuck together, repeat the process with the damp cloth.

Change the sewing thread to 60 wt. thread. Sew the contrast band to the gown with the right side of the contrast band to the wrong side of the fabric. Trim seam allowance. Understitch. Then press the contrast band to the right side of the fabric and pin the band to the gown along all the scalloped edges/points.

With 80 wt. thread in the top and bobbin, stitch the contrast band to the gown along the folded edge.

PINSTITCH HEM TREATMENT

To prepare the gown for the pinstitch, heavily starch (NOT ELLEN’S BEST PRESS) the hem of the dress. Allow to dry. Then press.

Cut 2″ strips of water soluble stabilizer (Sulky Fabri-Solvy) to the wrong side of the dress centering over the scallops and overlapping the stabilizer as needed.

Set the sewing machine to a pinstitch/hemstitch. The correct stitch will go back and forth 2x and then zigzag once. Use a #110 needle, 80 wt. thread on both the top and the bobbin and the open toed foot. Set the stitch to 2.5 L and 2.0 W. Stitch along the scallops, pivoting as needed and pivoting at the points (see video).

(optional) Trim away excess stabilizer carefully.

ALTERNATE HEM TREATMENT

If you machine doesn’t have a true pinstitch, a double needle hemstitch can be done using a double top-stitching stitch on the sewing machine. This stitch will go forward one stitch, go back one stitch, then go forward again in the same hole, repeat (so forward one, back one, forward 2). I have always called this a double stitch. Some call this a lightening stitch. Again, it is recommended that this stitch is practiced on scraps of fabric before doing it on the gown.

Starch the hem of the gown before beginning. Cut 2″ strips of water soluble stabilizer and pin them behind the scallops of the gown, overlapping as needed.

With 60 wt. thread on top and in the bobbin, the double hemstitching needle and an open toed foot, center the fold of the scallops between the 2 needles and stitch the double top-stitch, pivoting as needed. When the peak of a scallop is reached, leave the needles down, raise the pressure foot, pivot, set the pressure foot down and continue stitching. The fabric will look distorted when you pivot at the point, but as soon as the stitching continues, it will flatten out and look right.

Trim away excess stabilizer.

Regardless of which hem treatment was used, the remainder of the back of the gown can now be finished with a narrow hem.

Soak the gown in cold water for 5 minutes to remove all of the blue wash-out marker. If this doesn’t remove all of the stabilizer, then hand wash the garment in warm, sudsy water and agitate a bit. Rinse completely. Hang to dry and press as needed.

To finish the back of the gown, cut a length of 1/8″ ribbon (32″ – 40″, depending on size). Thread the ribbon into a tapestry needle and insert into the bias band at the neck. Begin at the edge of the bias band at one end and come out at the end of the smocking at the opposite end.

Sew 2 snaps on the back of the gown, the first snap 1″ below the bias band and the second snap 1″ below the first.

I hope you’ve enjoyed the sew-along and have gained some new tips and techniques that can be used in future projects! Please ask any questions you may have and I’ll be glad to answer!

Happy Stitching!!!

Kathy

YouTube Links:

Sew-Along, Lesson 1

Sew-Along, Lesson 2

Sew-Along, Lesson 3

Sew-Along, Lesson 4

I am adding links to the complete list of the products I’ve used throughout the series should you decide that you need any of these.

Gingher Pocket (Kindergarten) Scissors

Point Pusher with Ball End

Imperial Batiste

Schmetz 70 Microtex Needle

Schmetz 110 Jeans Needle

Schmetz Double Hemstitch Needle (if your machine doesn’t have a pin-stitch)

Long Tweezers

Rotary cutter

Press and Cut Board

Ruler with Grid

Starch

Water soluble thread Vanish Lite

Blue Wash-out Marker

Freezer Paper

Long tweezers

80 weight thread – Aurifil or Madeira Cotona

60 weight Mettler thread

Sulky Fabri-Solvy or other water soluble stabilizer

Plastic Snaps

White 1/8″ satin ribbon

Tapestry Needle

Disclosure: The recommended products contain affiliate links. If you purchase something through one of those links I may receive a small commission, so thank you for supporting me when you shop! These are my opinions and are not representative of the companies that create these products. These are the products I use and have gotten great results with. I would never recommend poor quality products.

Wee Care Sew-Along, Part 2

After downloading the pattern, follow the instructions and cut out the gown fabric/rectangle as directed. Fold the rectangle in half, and then in half again in order to cut out the armhole curve.

The armhole curve has TWO placement lines. For the gown that has NO SIDE SEAMS, use the inside line!!! Place this line on the fold and cut around the armhole.

Next cut the sleeve rectangles. If you plan to use the boy’s pleated sleeve pattern, add 1″ to the depth of the rectangle. Using the same armhole curve, cut the sleeve armhole on the OUTSIDE placement line.

Decide on what sleeve treatment will be used. For a smocked sleeve, pleat the sleeves with the desired number of rows (I usually pleat 5 half spaces, 7 for a NB) and be sure to leave the pleating threads long enough to flatten the sleeves out in order to finish the lower edge of the sleeve with a narrow rolled hem or with lace.

Before attaching lace, it is best to starch the lace. For this, use starch, not Ellen’s Best Press. Ellen’s Best Press is a starch alternative, not starch – you won’t get the same crisp results with it as you will with real starch. I use Faultless Heave Spray Starch (link below). It is also available at grocery stores, WalMart, etc.

Attach lace or hem the sleeve bottom. If you need a refresher on how to attach lace, I do have an e-book available on my Etsy site.

https://www.etsy.com/listing/586348280/french-machine-sewing-primer-with-bonnet

For a boy’s pleated sleeve, follow the instructions on the file below (click on the blue PDF) to download the file. This includes instructions for all sizes. Read before cutting out and making the sleeve!!!

Stitch the underarm seam allowance with a TINY 1/4″ SEAM. I have a Youtube video on how to do this:

With the sleeves completed, stitch the sleeve into the armhole. If you have cut & stitched accurately, the sleeve will fit into the armhole perfectly.

Of course, all of the instructions and demonstrations can be seen on my YouTube channel:

This is a longer video, so if you already know how to attach lace, roll & whip, etc., you can fast forward through those parts! 😊 I just wanted to make sure that someone new that wanted to try this would have enough information to apply lace correctly.

You are ready to pleat at this point. Please follow the pleating video if you would like to see how I pleated the gown. Pleat with the number of rows recommended or desired.

Stay tuned for the hem instructions!!!

Links for some of the additional supplies I used – you may already own these:

Rotary cutter

Press and Cut Board

Ruler with Grid

Starch

Keep on stitching!!!! If you have questions, please ask and I’ll answer them here.

Kathy

Disclosure: The recommended products contain affiliate links. If you purchase something through one of those links I may receive a small commission, so thank you for supporting me when you shop – it gives me a little bit back for my time producing these videos! These are my opinions and are not representative of the companies that create these products. These are the products I use and have gotten great results with. I would never recommend poor quality products.

MICRO-PREEMIE BUNTING PATTERN – for under 1 lb. babies

Today as I worked on a Wee Care gown, I realized that the micro-preemie bunting pattern and instructions that I’d previously shared was one that was lost. Therefore, I’m sharing it again so that anyone wanting to make these and donate to their local hospitals has access to the pattern.

This sweet little bunting has been designed as a burial bunting for micro preemie babies. It stitches up quickly and uses minimal amounts of fabric. Quilting the fabric gives it the necessary body. Small bits of lace or trim can be used for embellishment if desired. A little hand or machine embroidery can be done very quickly.

In the past, I used one of the bunting patterns that was shared online. While I was happy with the finished bunting, it was far too complicated (my opinion).

This bunting is designed to ensure that the baby is securely wrapped. It can be completed in a very short time and it is done completely by machine.

Fabric for the inside of the bunting should be flannel.  A variety of fabrics can be used for the outside fabric.  If pre-quilted fabric is used it eliminates the need to quilt the fabric.  Quilting cottons, broadcloth, satin, lightweight fleece, etc. all work well for the outside fabric of the bunting.

Small scraps of trims or lace can be used to decorate the front flaps of the bunting.  These would include ribbons, soutache braid, Swiss eyelet lace, Val lace, rickrack, etc.

Supplies:

  • 12″ x 15″ piece of fashion fabric
  • 12″ x 15″ piece of thin cotton batting *
  • 12″ x 15″ piece of batiste
  • 12″ x 15″ piece of flannel (lining)
  • 24″ of 1/4″ or 1/8″ ribbon
  • 12″ of lace or trim (optional)
  • thread
  • blue wash-out marker
  • ruler with 1″ grid marks

*alternately, 3 – 4 layers of flannel can be used instead of batting

Instructions:

Open the PDF pattern file in Adobe reader on a laptop or desktop computer.  Print the pattern. Ensure that the pattern has been printed to the correct size by checking the 1” box.  Printing should be done from a computer, not a phone or tablet. Cut out the 2 pattern pieces and tape together, matching the notch.  Printing 2 copies of the pattern and taping both together down the center will give the full pattern piece, which is helpful for aligning patterns with designs that need to be centered.

To mark the fashion fabric for quilting, fold the fabric in half lengthwise and finger crease.  Open the fabric up.  With a blue wash out marker, draw a line along the crease.  Fold the fashion fabric in half across the width and crease.  Open the fabric up and using a blue wash out marker, draw a line along the crease.  Using a ruler with a grid, mark additional lines at 1” intervals along both the length and the width of the fabric.

Place batiste with wrong side facing up.  Place the batting on top of the batiste, matching all cut edges and then place the fashion fabric, right side up, on top of the batting, aligning all cut edges.  Pin to secure.  Starting at the center line of the 15” L, stitch along the line from top to bottom.  Moving out from the center line, stitch remaining lines until all the lines have been stitched along the 15” length.  Repeat for the process for the 12” width to complete the quilting of the fashion fabric.  (For interest, the grid can also be stitched at 45º angles.)

Cut out the bunting pattern from the quilted fabric and another bunting from the flannel.  It works very well to print 2 copies of the pattern and tape them together in order to work with the full size pattern.

Tip – the pattern can be traced onto the quilted fabric and then straight stitch along the drawn line. This secures the 3 layers together and is easier to work with. Cut out the shape just outside the stitched lines.

Cut straight across the top of the bunting, leaving the “dip” section in the front uncut.

With a blue wash-out marker, mark the front “dip” section. This will be the dart that makes up the shape for the bunting hood. It is easier to sew the dart in first and then trim away the excess fabric. Mark the dot below the dip as well as the placement lines for the ribbons with a blue wash-out marker.

With right sides together, stitch the dart/seam for the hood of the bunting, stopping at the circle.  Repeat for flannel.  Trim away the excess fabric inside the dart. Do any embellishments desired at this point.

Cut the ribbons into 6” lengths and pin the ribbons to the quilted fabric at the placement lines.

With right sides together, pin the flannel to the quilted fabric all around the outside edges.  Stitch around the entire bunting, leaving a 2” opening between one set of ribbons. 

Trim seam allowance a little, clip curves and clip the corners at an angle, stopping before reaching the stitching line.

Pull bunting through the opening to get it right side out. Press. Edge-stitch around the entire bunting, closing up the 2” opening.

Remove blue wash out marker by spritzing or soaking in cold water for 5 minutes.

Fold up lower section, bring outside sections together and tie the ribbons into a bow.

These are so quick to make, it’s easy to finish several of them in a very short time. Be creative with little bits of trim.

I hope that this will inspire you to use up some of your smaller pieces of pretty fabric and create a sweet bunting! I am including the PDF file for the pattern for your use. Click on the link below to download.

Keep on stitching…….

Kathy

Ka

PRESSING – TOOLS OF THE TRADE

Professional looking results – isn’t that what everyone desires? Besides good sewing techniques, pressing, or lack of pressing, as you sew can make the difference between quality, couture/custom looking garments and a “home-made” looking garment. While the thrill of creating in front of the sewing machine is great fun, pressing each step of the way is absolutely necessary to create a polished looking garment. So, what kind of aides/tools are there to help create a fabulous finished garment?

A good iron and ironing board is needed for good pressing results. The iron does not necessarily need something expensive, but it is imperative that it has good steam capabilities. The ironing board is easily modified in order to obtain better pressing results. Ironing boards typically come with a shiny, heat resistant cover or a thin cotton cover. Neither of those will produce great results!!! Better results are achieved when these are replaced. The best ironing board cover will include several layers of natural fabrics. Begin with a thick 100% wool cover on top of the ironing board. This can be as simple as an old wool blanket (I have my dad’s old army blanket under mine – that horrible green!) cut to the size of the ironing board. If the wool is thin, use 2 layers. On top of that place a layer of 100% cotton batting – the kind you use for quilting. Again, this is cut to the size of the ironing board top. The final layer is the cover, which should be 100% cotton – white twill (think denim) works well and can easily be made.

Making your own ironing board cover is as simple as placing the ironing board on top of the fabric on the floor, tracing around it and adding to this measurement all around to handle the board depth (usually 1″) and then extra (3″ – 4″) in order to have the cover wrap underneath the board. Finish the outer edges by adding a casing and insert string or elastic so that the cover can be cinched up tightly – much like a bottom sheet of a bed.

As pretty as the designed covers are, they are not always the best choice. Print fabrics present the risk of having any colors from a transfer to the garments while pressing. White fabric looks crisp and eliminates that risk. The layers offer necessary padding and the cotton & wool retain heat & steam to improve the pressing process. The top cover is easily removed for cleaning!

Pressing vs. Ironing. Whenever sewing a garment, seams need to be pressed as they are sewn. Do NOT skip this step and wait until the garment is finished to press it – that will never render professional results. Ironing is a motion where the iron glides back and forth over the fabric. Pressing is an up and down motion on the fabric, lifting the iron to move from one section to another. It does not distort any of the fibers or stretch them out. Seams should be pressed, not ironed! The seam should first be pressed as it was sewn to meld the thread into the fabric. Then it can be pressed open or to the side, as needed, with whatever is being sewn. The last step is to press from on the right side of the fabric. The extra step takes seconds and makes a difference in the finished garment.

Pressing direction. Seams are typically pressed open. Seams that are sewn together (serged, French seams, etc.) will be pressed towards the back of the garment as it is worn. Darts are pressed down or towards the center if it is a vertical dart. Armhole seams are pressed towards the sleeve.

Pressing and/or ironing on the front of the fabric has the potential to cause problems, particularly with dark fabrics, fabrics with texture,etc. In these cases, use a pressing cloth if it is absolutely necessary to press on the front of the fabric to avoid any problems.

Pressing cloth. A good pressing cloth can save the day with many fabrics. It offers a protective layer between the iron and the garment. If possible, have several in different fabrics. A silk organza (100% silk) is nice for delicate fabrics and for times when it is necessary to see what you’re pressing. Also, a linen (100% linen) one is nice to have. Having both a lightweight, handkerchief linen as well as a heavier linen one is ideal. A linen kitchen towel works well for a heavier linen. These should have finished edges so that they can be washed as needed. Dish towels work great for a heavier linen cloth.

Hams/ham holder and sleeve rolls. These are invaluable pressing aids. The ham has nice curves that allow you to press curved areas nicely, such as darts or necklines and armholes. If the seam goes around a curve, it ought to be pressed with a curved pressing aide. A ham holder is a great way to keep the ham upright while pressing around the neckline and shaping the collar. The sleeve roll can also be used around necklines and armholes, though it may be a bit more challenging. It is great to slide into small places that need a good press, such as the sleeve. Both the ham and the sleeve roll will have one side with wool and the other side with muslin. The wool side should be used for pressing wools and the muslin side for pressing cottons and linens.

Clapper. This is a wooden shaped board that is used to set the seams. The wood draws the heat out of the garment quickly, which helps set the seam and sets the press. They frequently will have grooves along the sides for fingers in order to keep a good grip on the block. This is also available as a combination clapper with a point press.

Seam Stick. Again, this is another wooden tool for pressing seams and works fabulously for pant legs and long sleeve seams. Because the edge is curved, the seam is pressed without leaving an imprint of the seam allowance on the right side of the fabric since only the seam itself sits on the stick. Because it is wood, it also draws the steam out of the garment fabric quickly, giving a nice, hard press to the seam. These can be purchased in shorter and longer lengths and some are available with a cover.

Tailor Board. This board is also wood and has lots of curves and a nice point in order to get into tight places, such as collars, cuffs, etc. Dritz has a great blog post/tutorial on how to use this with garments and all the different curves and angles. For coats or blazers, this tool is invaluable!

Sleeve Board. This is exactly what it says – a narrow ironing board that will fit inside sleeves in order to press them. Because of the small size, it also works well for children’s clothing, dolls, etc. If using this, padding it in the same as the ironing board is a good idea.

Needle Board. This is an expensive, specialty tool and is only needed when pressing fabrics such as velvet or velveteen. The needles provide depth and protects the fabric pile from being crushed when pressing the seams.

Obviously, there are many more pressing aides that can be used, though they may be less utilized. Some things that come to mind are protective fingertip covers, pressing mitt, Rajah cloth, mini iron, an iron finger, pressing sticks, etc. If you have the space and the disposable income, these are also nice to have. The latest rage seems to be wool mats. I haven’t seen the need for these and they seem to have some drawback. I suspect that quilters find more use for that than someone constructing garments.

Many of these pressing aides can be made, particularly if you have access to woodworking tools. Any wood items ought to be made from untreated hardwoods. There are plenty of patterns/tutorials online for most of them and a quick google search will render a plethora of results.

If some of these tools are unfamiliar to you, there are numerous YouTube tutorials on how to use them. Seeing the tools in use can be enlightening. Many of these pressing aides will be like a microwave – when they first came out, many didn’t see the need for them, but once you have one, you cannot imagine living without one. 😊

Links to some of the tools shown:

Pressing clapper

Tailor’s ham

Ham holder

Point Presser/Clapper

Clover Mini Iron

Sleeve Roll

Sleeve Board

Tailor Board

Rajah Pressing Cloth

Iron Fingers

Happy Pressing!!!

Kathy