
Professional looking results – isn’t that what everyone desires? Besides good sewing techniques, pressing, or lack of pressing, as you sew can make the difference between quality, couture/custom looking garments and a “home-made” looking garment. While the thrill of creating in front of the sewing machine is great fun, pressing each step of the way is absolutely necessary to create a polished looking garment. So, what kind of aides/tools are there to help create a fabulous finished garment?

A good iron and ironing board is needed for good pressing results. The iron does not necessarily need something expensive, but it is imperative that it has good steam capabilities. The ironing board is easily modified in order to obtain better pressing results. Ironing boards typically come with a shiny, heat resistant cover or a thin cotton cover. Neither of those will produce great results!!! Better results are achieved when these are replaced. The best ironing board cover will include several layers of natural fabrics. Begin with a thick 100% wool cover on top of the ironing board. This can be as simple as an old wool blanket (I have my dad’s old army blanket under mine – that horrible green!) cut to the size of the ironing board. If the wool is thin, use 2 layers. On top of that place a layer of 100% cotton batting – the kind you use for quilting. Again, this is cut to the size of the ironing board top. The final layer is the cover, which should be 100% cotton – white twill (think denim) works well and can easily be made.

Making your own ironing board cover is as simple as placing the ironing board on top of the fabric on the floor, tracing around it and adding to this measurement all around to handle the board depth (usually 1″) and then extra (3″ – 4″) in order to have the cover wrap underneath the board. Finish the outer edges by adding a casing and insert string or elastic so that the cover can be cinched up tightly – much like a bottom sheet of a bed.

As pretty as the designed covers are, they are not always the best choice. Print fabrics present the risk of having any colors from a transfer to the garments while pressing. White fabric looks crisp and eliminates that risk. The layers offer necessary padding and the cotton & wool retain heat & steam to improve the pressing process. The top cover is easily removed for cleaning!
Pressing vs. Ironing. Whenever sewing a garment, seams need to be pressed as they are sewn. Do NOT skip this step and wait until the garment is finished to press it – that will never render professional results. Ironing is a motion where the iron glides back and forth over the fabric. Pressing is an up and down motion on the fabric, lifting the iron to move from one section to another. It does not distort any of the fibers or stretch them out. Seams should be pressed, not ironed! The seam should first be pressed as it was sewn to meld the thread into the fabric. Then it can be pressed open or to the side, as needed, with whatever is being sewn. The last step is to press from on the right side of the fabric. The extra step takes seconds and makes a difference in the finished garment.
Pressing direction. Seams are typically pressed open. Seams that are sewn together (serged, French seams, etc.) will be pressed towards the back of the garment as it is worn. Darts are pressed down or towards the center if it is a vertical dart. Armhole seams are pressed towards the sleeve.
Pressing and/or ironing on the front of the fabric has the potential to cause problems, particularly with dark fabrics, fabrics with texture,etc. In these cases, use a pressing cloth if it is absolutely necessary to press on the front of the fabric to avoid any problems.
Pressing cloth. A good pressing cloth can save the day with many fabrics. It offers a protective layer between the iron and the garment. If possible, have several in different fabrics. A silk organza (100% silk) is nice for delicate fabrics and for times when it is necessary to see what you’re pressing. Also, a linen (100% linen) one is nice to have. Having both a lightweight, handkerchief linen as well as a heavier linen one is ideal. A linen kitchen towel works well for a heavier linen. These should have finished edges so that they can be washed as needed. Dish towels work great for a heavier linen cloth.

Hams/ham holder and sleeve rolls. These are invaluable pressing aids. The ham has nice curves that allow you to press curved areas nicely, such as darts or necklines and armholes. If the seam goes around a curve, it ought to be pressed with a curved pressing aide. A ham holder is a great way to keep the ham upright while pressing around the neckline and shaping the collar. The sleeve roll can also be used around necklines and armholes, though it may be a bit more challenging. It is great to slide into small places that need a good press, such as the sleeve. Both the ham and the sleeve roll will have one side with wool and the other side with muslin. The wool side should be used for pressing wools and the muslin side for pressing cottons and linens.

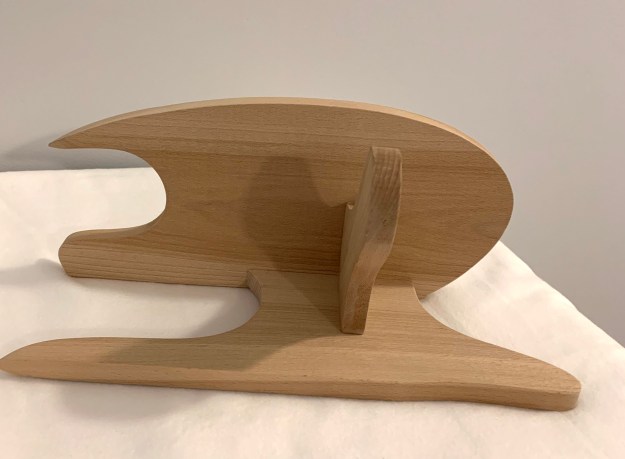
Clapper. This is a wooden shaped board that is used to set the seams. The wood draws the heat out of the garment quickly, which helps set the seam and sets the press. They frequently will have grooves along the sides for fingers in order to keep a good grip on the block. This is also available as a combination clapper with a point press.

Seam Stick. Again, this is another wooden tool for pressing seams and works fabulously for pant legs and long sleeve seams. Because the edge is curved, the seam is pressed without leaving an imprint of the seam allowance on the right side of the fabric since only the seam itself sits on the stick. Because it is wood, it also draws the steam out of the garment fabric quickly, giving a nice, hard press to the seam. These can be purchased in shorter and longer lengths and some are available with a cover.

Tailor Board. This board is also wood and has lots of curves and a nice point in order to get into tight places, such as collars, cuffs, etc. Dritz has a great blog post/tutorial on how to use this with garments and all the different curves and angles. For coats or blazers, this tool is invaluable!
Sleeve Board. This is exactly what it says – a narrow ironing board that will fit inside sleeves in order to press them. Because of the small size, it also works well for children’s clothing, dolls, etc. If using this, padding it in the same as the ironing board is a good idea.

Needle Board. This is an expensive, specialty tool and is only needed when pressing fabrics such as velvet or velveteen. The needles provide depth and protects the fabric pile from being crushed when pressing the seams.
Obviously, there are many more pressing aides that can be used, though they may be less utilized. Some things that come to mind are protective fingertip covers, pressing mitt, Rajah cloth, mini iron, an iron finger, pressing sticks, etc. If you have the space and the disposable income, these are also nice to have. The latest rage seems to be wool mats. I haven’t seen the need for these and they seem to have some drawback. I suspect that quilters find more use for that than someone constructing garments.

Many of these pressing aides can be made, particularly if you have access to woodworking tools. Any wood items ought to be made from untreated hardwoods. There are plenty of patterns/tutorials online for most of them and a quick google search will render a plethora of results.
If some of these tools are unfamiliar to you, there are numerous YouTube tutorials on how to use them. Seeing the tools in use can be enlightening. Many of these pressing aides will be like a microwave – when they first came out, many didn’t see the need for them, but once you have one, you cannot imagine living without one. 😊
Links to some of the tools shown:
Happy Pressing!!!
Kathy