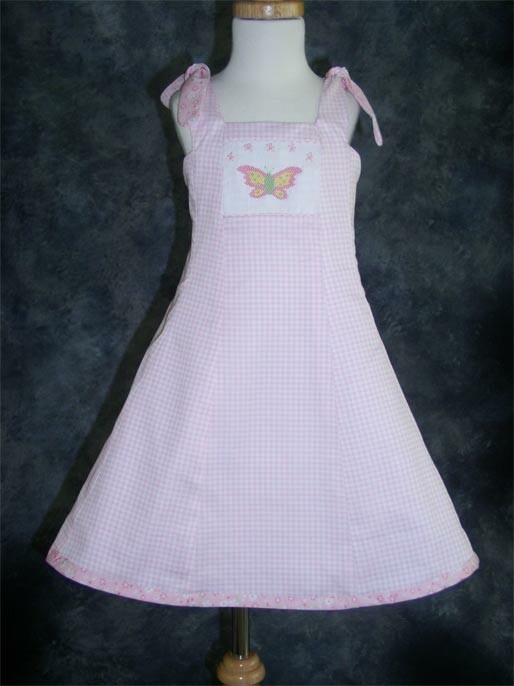
These dreary, cold days keep me inside thinking about the warmer weather that will be here sooner than you know! With that in mind, I’ve been busy drafting, smocking & sewing my newest (actually old) pattern to get it ready for my Etsy shop.
I have loved this dress since first seeing a vintage pattern with these lines. What was popular in the 40’s is still a fabulous style for girls today! Some things never go out of style!!! Of course, I had to add my spin on it and make it suitable for smocking just because I love smocking! However, it can also be made without smocking. My latest version of the dress was made for our oldest granddaughter, so without the smocked insert.
Because of the poor weather, we had to do pictures inside. She was quite happy with her new dress and I’m sure it will get plenty of wear once we get into spring/summer!
Of course, I had to make a couple of the dresses with smocked inserts – just because! They will head to the closet to join the rest of the children’s clothing residing in the closets that I refer to as “Kathy’s Creations”.
OLYMPUS DIGITAL CAMERA
The back features elastic for an easy fit. It can be a single elastic at the top, which I like for the little ones, or several rows of elastic as was done in the bigger size dress. Instructions for both versions are included in the pattern.
This dress was first made in 2010 and is still just as cute as ever!!! The sailboat smocking design is included with the pattern.
These sweet spring lovebirds are also included with the pattern. I wanted a smaller smocking design to use with the smaller sized dresses.
I couldn’t help myself – I had to make yet another dress! Oh, the closet is getting some cute additions!!! There are so many ways that I can see this dress made up! I hope others will enjoy it as much as I do!!!
With the additional time spent at home this last year, I’ve learned some new things, including how to make my pattern as a layered version. Many seem to like this as it eliminates needing to trace out sizes. Head over to my Etsy shop if this pattern is something you’d like to add to your collection!
If you wish to follow my blog, please sign up. It seems that I “lost” my followers with the recent blog troubles. 😕 However, signing up is easy and you’ll only get notices when I post something new, which isn’t too often!
Enjoy stitching something beautiful as you await spring/summer weather!
What did I do the first day of the New Year???? I sewed, of course! It was a quiet day and I decided it was the perfect day to sew something. This new year I hope to sew more of the patterns that I own and not just stitch up the same a-line jumpers that I love on the little girls.
My first dress was made for Eva so that she and her big sister can have matching, but not identical dresses. To stick with my sewing plan of using different patterns, I chose the Children’s Corner “Carol” pattern. I may have sewn this pattern up before – the pattern pieces for one size were cut, but I have no recollection of ever making this dress before, so I’m counting it as a different pattern.
I used the same wide wale cotton pique that Ella’s dress was made from as well as the same rick rack. I had the little ball buttons in my stash, and they seemed perfect for this little dress. I love the classic style with the box pleat in the front. This was a quick dress to sew up.
Because this is heavier fabric and will probably only be worn in colder weather, I wanted something longer than the short sleeve that comes in the pattern, so I went through my Children’s Corner patterns and found a sleeve on the Madelyn pattern that was 3/4 length with a cuff. Perfect! While they look like they stick out kind of funky on the mannequin, I’m hopeful that they will look sweet on Eva.
I would have posted this sooner, but the Christmas decorations all boxed up and ready to return to their attic space had taken over my photo studio! Today I couldn’t stand it any more, so they are back in the attic and I have my photo space back.
Next up is some skirts that I’m drafting for our youngest daughter. Sewing and creating pretty things is so enjoyable! I hope you’re getting in some sewing time as well.
The weekend provided some quiet days that were spent sewing, creating and enjoying the slower pace and the process. Because there were no deadlines (Christmas shopping/wrapping is finished), I was able to take my time and enjoy each step of the sewing and design process. It’s a simple dress, so nothing new or stressful to deal with.
The project started with the polka dot leggings in my stash. In case you haven’t noticed, I’m trying to sew up fabrics and use trims, laces, buttons, etc. from the stash. That makes the outfits free, right??? LOL! After some stash diving, I came up with a perfect match. The fabric is a nice, heavier line pique – perfect for our southern winters. I chose the Children’s Corner Apron pattern and used the Jenna Leigh view of the pattern. My daughter requested a long sleeve dress, so I went through my other Children’s Corner patterns to find something with a long sleeve. Were you aware that the collars/sleeves on the Children’s Corner patterns are interchangeable??? I love that!!! I found the Louise pattern and used the long sleeve from the blouse. Well, sort of used it – it was a very 80’s look with full sleeves and a puffy sleeve cap. I removed a couple inches from the fullness and lowered the sleeve cap and felt that the finished sleeve was a better fit/look for the fabric choice. I always have found the CC pattern long sleeves to be too long – both for our children and grandchildren as well as for the numerous clients that I sewed for over the years, so I removed about 2″ of length. I think the finished sleeve should be perfect.
Rather than use the pocket that is in the pattern, I chose to do a monogram instead. This is another of the Embroitique fonts. As I worked on the dress, I realized that I had no matching piping nor any fabric that was the right color. Ugh! Thankfully I found some rick rack that was a perfect match! Oh – I love when things come together like that! When the dress was finished, I pulled out the button box and found the perfect buttons. However, sadly there weren’t enough for the dress. I found other matches, but wrong sizes. I had to go out and find buttons, which I discovered was no easy feat!!! Chain stores continue to carry less and less buttons and no matching buttons were found. I resorted to looking in the scrapbooking/craft sections of stores, and after a couple different stores managed to score a large bag of mixed buttons that had some that were just right. I was so pleased to discover that there were just enough for the dress in the one package!!! Whew! Dress done!
This dress is such a classic style and the back is as pretty as the front! The box pleat is so cute.
I have plans for a matching sister outfit, but doubt that will get done before Christmas!
As I cleaned my sewing room, I found the smocked monogram insert that I had done for our new grandson. I had planned it to be for his baptism outfit, but pleated the wrong fabric. I didn’t notice until the smocking was finished. So, rather than waste the smocked piece, I dove into the stash again and found a piece of fabric that I thought would work with it. It is an end on end piece of khaki/tan and compliments the white insert with ecru smocking really well. I sized up my pattern to a 9 mo. size – he’s growing so quickly that I feared the 6 mo. wouldn’t fit for long at all. He’s already wearing that size quite well and will be out of it soon! I don’t have a good way to photograph boys long-alls yet. Something that I’ll need to sort out soon! Oh dear, sorry for the blurry picture.
The smocking design is from the Ellen McCarn pamphlet on monograms. I’ve used this so many times and feel sure I’ll continue to use it.
I’m sure that both of these outfits will look much cuter on the kids than they do in my pictures!
Now I will have to decide what I’ll be sewing next. I think that the next couple days I will need to work on food for Christmas day rather than spend another quiet day in the sewing room. I know the kids will all prefer that!
During this busy Christmas season, take time to stop and remember the reason for the season. God gave us the most precious gift ever – his son, our Lord Jesus Christ who came to take away the sins of the world! I love reading through the gospel accounts of his birth during the holidays and hope that you do as well.
I have’t disappeared – I’ve just been busy, as I’m sure everyone else has! Thanksgiving was a wonderful celebration. We enjoyed having all our kids and grandkids over for the feast along with a few extras. It’s always fun to have everyone around.
Since then, it’s been busy getting gifts wrapped, spending extra time with the grandkids (LOVE our babies!!!), finishing up last minute shopping, etc. I’m finished with that. Whew!!!
Our youngest daughter requested some pillows for her apartment, so we spent time looking through my rather extensive supply of embroidery designs and she found just what she wanted. They are such pretty designs! The pillows are simple – no piping or other cording decorations – just pretty embroidery done on red velveteen.
The reindeer design comes from Bernina and is called Elegance Entwined. The Believe design comes from Embroitique.
This weekend I decided to enjoy another simple sewing project, so I pulled out my Children’s Corner “Lucy” pattern – this is a tried and true pattern and always looks sweet on the little girls. I was trying to match some tights that were in my stash of little girl tights. What happens next will make you laugh! The tights all packaged up (you’ll have to imagine the cardboard package surrounding the tights) looked like this:
So I envisioned large polka dots and selected my embroidery designs with that in mind. Many, many polka dots were embroidered!!! Then it was time to photograph the completed sister jumpers, so I thought it would be fun to show the tights underneath the jumper. Imagine my surprise when they ended up looking like this!
Clearly, they are more like polka dot stripes. The huge polka dots that I was so excited about will be hidden underneath the dress. LOL! The moral of this story is – pull the tights out of the packaging to get the full picture and avoid any surprises! Sadly, I only had tights for the larger dress, but I’m sure that something suitable will be found for the smaller one.
The embroidery designs from these jumpers came from a variety of places. The embroidery on the chest of the smaller jumper comes from Bunnycup and is called Lots of Dots Font. The rick rack design on the chest of the larger jumper comes from Zippy DesignZ. The large polka dot appliqué circle design is from Lynnie Pinnie and the letter E inside the patch is Diva Dots Font from Five Star Fonts. It was so fun to put all these designs together to come up with the polka dot jumpers.
So, this was my weekend polka dot sewing. Nothing too exciting – just some fun sewing for the little girls. I hope you’ve been able to squeeze in some fun sewing in between all of your busy holiday events as well.
I’ve finished up my last Christmas dress. Sadly, it’s not exactly what I had expected. I hate when that happens! I thought I’d write-up a review of the pattern so that nobody else will have the same experience.
With Christmas fast approaching, I had to get the dress done quickly. Wanting a dress that wasn’t quite so traditional, I chose the same dress that I had designed for Australian Smocking and Embroidery – a basic yoke dress with a lowered neckline and no collar. That dress fits my granddaughter perfectly right now, so it was an easy choice for me to make.
This dress was featured in Australian Smocking & Embroidery magazine, Issue #88 (Red Birds). I designed the dress, sent the pattern pieces along with the dress in to the magazine and the dress pattern is in the pull out section of the magazine. Obviously, they had their own model and photographer. I love this dress on Ella – love the neckline, sleeve length and, well, pretty much everything about it. Could this be any cuter on Ella!?!?!? Such a great fit as well!
Because of all my recent sewing, the room was trashed filled with creative inspiration, so I chose to pull out the magazine and trace off the pattern rather than find my originally submitted pattern. I traced off the size 4 (same size I sent in) and proceeded with the sewing – I was on a mission to get it done. It wasn’t until after the bodice was entirely finished and I was pressing the neckline that I noticed that it seemed smaller. I wasn’t going to deconstruct and re-sew the whole bodice, so I decided that it would just have a closer neckline, though I wasn’t happy about the change. They say a picture is worth a thousand words, so here’s the Christmas dress.
The neckline is significantly higher and the dress is larger. I should have known that the dress sizing would be larger – the AS&E patterns are always more generous in fit. A size 3 would have been a better choice for that. I take full responsibility for that mistake. However, the totally different neckline is inexcusable as far as I’m concerned.
The magazine features the yellow dress, so one would expect to get a dress with an open neckline, and not a close-fitting neckline. It is the editor’s choice to make changes, but when you change the “lines” of a pattern but then show a dress that does not reflect the changes and no mention is made of the changes – aka: “we have chosen to give the dress a higher neckline than the modeled garment” – that hits a nerve with me. I thought I was sewing the same dress and clearly it isn’t the same. Needless to say, I’m disappointed. I suspect anyone else that has made this pattern has had the same experience.
Seamstress beware – this is not the dress you’ll be getting in the magazine pull-out. If you want this neckline, you need to trim away at least 1/4″ – 3/8″ all around.
On the positive side, I love Janet’s new smocking plate! The elves are adorable!!! Ella was ecstatic about “Elfie” as she calls him. Another positive is that I made the dress long enough – it will fit again next year. As cute as Ella is, I’m sure that the generous fit won’t be noticed by too many that will be seeing her. Also, observers will be unaware of the fact that I had hoped for a lower neckline. LOL! So, really, it’s only me that is bothered by this.
My other “fail” for the day was a pair of pants for Ella. I measured her at the end of September for pants length, so thought I had that made as well. Wrong again. She’s grown! The pants are too short. Oy!!! Back to the drawing board. Unfortunately, I have a second pair of too short pants cut out. LOL! Some days are just like that!
My suggestion of the day – rush over to Janet’s website and get her Elf plate and have some fun smocking. The pull out a tried and true pattern and sew it up for Christmas! You can bet that’s what I’ll be doing for Easter dresses!!!
My latest Christmas bishop dress has stirred up a lot of interest and questions from fellow smockers. It’s no secret that I love picture smocking! I also love bishop dresses. My favorite bishop dresses are the ones that combine picture smocking with a dip in the front. That allows for a nice, big picture smocked design without interfering with the integrity of the fit of the bishop.
I thought I’d share the methods that work for me when I choose to add a picture smocked design to a bishop dress. There’s no “one” way to do this, rather, the geometric design and flow has to be something that works with the picture smocking design that has been chosen. Sometimes a couple attempts are needed before the desired look is achieved.
First and foremost, I always construct my bishop dress prior to smocking. This is particularly important when choosing to do a picture smocking design as it allows you to visualize the pleats and their “spread” while you’re working on it. This helps to reduce the possibility of smocking too tightly for a bishop. Obviously, you have to have an idea of what you’re going to smock (aka: how many rows to pleat) before you construct.
As you might expect, you will need to backsmock behind the picture area as well as around any unsmocked areas around the neckline. This is another reason that making the dress up prior to smocking is helpful. I generally do my backsmocking with a cable stitch (shadows of these cable stitches can be seen from the front as with any picture smocked design), but a wave stitch or trellis can also be used and can create an interesting background shadow.
If the idea of having so many rows all around your dress causes you stress, you can always use the seamless bishop pleating method that Martha has written a tutorial on and just have the additional rows in the front of the dress design. If you choose to use this method, I’d probably add an additional row (more than the suggested amount from the pattern) to the sleeve pieces, just to make sure that you’ll be able to do the necessary ascent when you get to that point in the smocking.
As you will be able to see with most of the pictures shown in this post, most of the ascending stitches will involve several trellis stitches up (4 – 8+), then a break with 2 – 4 cable stitches, then repeat of the trellis upwards, cables, etc. until you reach the spot where you want to continue and finish around the neckline. If no other figures or picture smocking will be done, you can go up to where you’ve only got a couple rows smocked around the neckline. Of course, with larger sizes, you’d probably want to have a few more rows smocked than with smaller sizes.
For this Christmas design, I chose to descend and ascend around the ornament in a repeated sequence. That is not always the way that I choose to do it, but it worked well for this one. The 3 closely smocked outline is done in a way that made me think of candy canes. I thought I’d share the smocking graph with you in case this is something that you’d like to try and you don’t want to “think”. The only element that I couldn’t successfully graph was the outline stitch that was done in white floss around the neckline row of rick rack. Stitch that as closely as possible to the red.
Once the bishop dress is constructed, I smock the main picture first. After I “see” how this fills the area, then I decide what or if I will add any other picture smocking designs around the remainder of the bishop dress, or if it will just have a few rows of geometric smocking. Each design is unique.
Because of the shape of this mouse/candy cane, a row of cable stitches were used across the lower edge of this bishop dress. As soon as it was possible to begin the upward stitching (determined by the lowest edge of the candy cane), a similar upward design was done. No additional picture smocking designs were added around the dress.
For the Santa design, the lower edge has trellis stitches underneath the Santa, then a slight ascent begins and a few trees were added around the dress. The geometric borders on this design are done in white and very subtle. I felt a bright red border would not look pretty on this fancy dress.
This summer dress featured one large apple and worms around the neckline. The border was kept simple due to the busyness of the print and smocking designs. Just a few cable stitches at the bottom of the apple were needed before the sharp ascent upwards.
This is another example of a large design that required cable stitches at the bottom and then a steep trellis upwards with narrow breaks of 2 cable stitches. Again, no other picture smocking designs were needed around the neckline.
This dress is a variation of the bishop dress that was featured in one of the Australian Smocking and Embroidery magazines. The larger flower was chosen for the center front, but then smaller flowers around the neckline. This design does not have as sharp an ascent upwards and was more determined by the shape of the diamonds in the background smocking. I liked this design so well that I smocked it a couple times! LOL!
This was one of my more unusual dip front designs. A pink Cinderella and her silver shoe (barely shows up to the right of the girl). This was not a favorite of mine, but my client loved it.
This design was definitely one of my favorite ones! I was able to keep the geometric design underneath the snails, but then ascend upwards and just had a few random butterflies stitched around the remainder of the bishop.
Sorry this is a bit difficult to see with the watermark placement, but the frog also has cable stitches underneath and then it ascends to a point where there’s just a small bit of smocking around the remainder of the bishop.
This was another set that I loved. The dress maintains a geometric trellis design that continues the up/down design that we’re accustomed to seeing on a bishop. The difference is that you to up maybe 4 trellis stitches, then down only 2. This gives a nice, gentle ascent to the design.
This was another favorite dress for a little girl’s first birthday. This also has a gentle ascent marked by several trellis stitches up, a few cable stitches, more trellis stitches up, but not too far up to leave room for the birthday balloons.
The same method can be used for geometric designs and is equally pretty. I won’t add descriptions, but will let the pictures speak for themselves.
In the end, you’re the designer. Don’t be afraid to try something new. If you get your picture smocked and your first attempt to surround it with your own “dip” design isn’t a success, take the stitches out and try again. It is easiest to start the dip design from the center front and work your way around one side. Then turn the dress upside down and do a mirror image of the design on the other half of the dress. These are so fun to create and will get you thinking out of the box. Have some fun with it!!!
With only a few weeks until Christmas, and fewer weeks until the little ones can start wearingChristmas outfits, I had to get busy with sewing! I had already made an outfit for Liam, prior to his birth – and I’m still hoping that this one will fit at the right time. He’s growing like a weed.
I used the same fabric to make a bishop dress for his big sister, Livvy. I just love this tiny micro-check fabric! I knew that I wanted to picture smock for her dress as well, and I love to have the smocking dip down in the front.
Won’t they look cute together!
For her smocking design, I chose several different smocking plates and then did my own “thing”.
The center ornament is taken from Cherished Stitches “Joy” smocking plate. I thought it needed a bow on top and tried out a ribbon bow, but wasn’t happy with the way it looked. Perhaps it’s because I tie a pitiful bow! LOL! So, I used the bow from Ellen McCarn‘s “Classic Bow”.
With the center design finished, and my outside smocking completed (I did my own thing to create the geometric design that dips), there was the problem of all that blank space around the ornament and in the back. What to do…..
I solved the problem of the blank area by using some of the holly designs from Ellen McCarn’s“Victorian Bow and Flowerettes”. The holly designs extend around the back of the dress and stop at the button placket. I always make my bishop dresses with button backs. My experience has been that the snap options that most patterns suggest have never stayed fastened on any moving children.
Finally, the neckline border is one that I designed and used in my first published design for Sew Beautiful magazine. It is rather labor intensive, but I love the results.
So, I have one dress finished and one more to go! I can do this!!! The next dress will be one with the new smocking design from Janet Gilbert – I loved her new Elf design and knew that I had to use it for Ella’s Christmas dress. I feel sure that you’re going to need this design as well!!!
Hopefully you’ll see a cute rendition of this smocking design in next week’s post! How’s your Christmas smocking coming along???
Today is the last day of October. A chill is in the air as so many little ones don their costumes for an afternoon or evening of Trick or Treating. Tomorrow the realization that Christmas is just a few weeks away hits and panic will set in for so many of us that want to have special hand-made Christmas outfits. With that in mind, I thought I’d offer some sewing inspiration from my past creations.
For many years I did custom sewing for clients, and for several of those years I had clients with twins, which doubled the pleasure! During this season of sewing, I determined that I should be taking pictures to save for my own personal reference – so, the photography was rather, well, tragic, to say the least. You will need to enjoy the inspiration without critiquing the photography. While my photography has improved over the years, I’m still a seamstress and not a photographer!
As many of you already may know, my favorite sewing is the fancy heirloom outfits, but they are also the least practical and least worn. So, I’m showing a range of clothing from casual play clothes to exquisite heirloom to funky boutique and I hope there’s something that will inspire everyone.
Featherwale corduroy smocked with Little Memories “Ski Follies”.
Featherwale corduroy smocked with Little Memories “Duck the Halls”.
Striped cotton smocked with Little Memories “Ho Ho Ho”.
Heirloom satin batiste smocked with Little Memories “Santa’s Surprise” and added trees.
Featherwale corduroy smocked with Little Memories “Holiday Handymen”.
Hunter green velveteen smocked with “Nutcracker” from Creative Needle and “Joy” by Cherished Stitches”, using just the ornament design.
Black featherwale corduroy smocked with “Chimney Sweeps” – I cannot seem to locate my smocking design plate to share the designer.
The color on this dress is just tragic, so an explanation is needed. The dress was a beautiful ecru colored cotton sateen with an organza collar and smocked with Little Memories “Bearly the Nutcracker”.
Stain batiste with shadow work embroidery.
Little brother’s satin batiste bubble with shadow work embroidery.
Bigger brother’s outfit. Satin batiste shirt with cotton sateen shorts. Honestly, the collars are even!
Satin batiste bishop smocked with “Holiday Bells” from Sew Beautiful magazine – holiday, 1992.
One of my personal favorites – the boy’s outfit made with satin batiste for the shirt and cotton sateen for the shorts and the girl’s dress is silk organza layer over satin batiste. The smocking design is Stocking Stuffers” by Little Memories.
Silk organza makes the most beautiful bows!
Beautiful shadow work collars for twin boys – I don’t seem to have pictures of the complete outfits and don’t remember if these were button-on suits or if these were worn with velvet jon-jons.
Another bad picture with pretty outfits – satin batiste for the dress and shirt and cotton sateen for the shorts. The monograms are from the Ellen McCarn monogram booklet.
Slightly more casual Christmas outfits – the shirt is broadcloth and the shorts and dress are micro check gingham smocked with Little Memories “Candy Cane Countdown”.
Broadcloth tops and featherwale corduroy smocked with Little Memories “All is Calm, All is Bright”.
Micro check gingham smocked with Little Memories “Northern Lights”.
Smocked top with original design. Top is broadcloth and the pants are featherwale corduroy.
So much cuter “on”.
A modified version of “Sandpiper” from Australian Smocking and Embroidery magazine #88.
Boutique ruffled set made of white broadcloth and a touch of smocking at the neck and sleeves and a smocked red velveteen pinafore. The pattern and smocking are an original design of mine.
Pattern is by Farbenmix called “Vida”. This is such a fun dress for combining fabrics and trims and then adding machine embroidery! Definitely a favorite fun dress of mine.
Even cuter “on”.
Several a-line dresses.
This doesn’t exhaust my supply of Christmas outfits from the past, but more than enough for one post. And now, I need to get on to smocking Christmas outfits for the 3 little girls since I only have Liam’s outfit finished. So many ideas, so little time!
What have I been up to lately??? Well, obviously I’ve still been helping with the new baby. Nothing like having that sweetness to rock for a while! They don’t stay little for very long. Here’s our little man in his smocked outfit – I think it will fit for maybe another week!
Hubby was gone for a little over a week, so I decided that this was a good time for a couple projects. Some of these are easier when you don’t have to clean up the mess at the end of the day! My pantry was in desperate need of organization. How on earth do pantries get to be such a mess??? So, a thorough cleaning out and throwing out of some outdated items. Because we’ve gone to wheat free eating, so many other types of flours are necessary, and they all come in 1 lb. bags which are hard to control. They were falling all over the place. I need to say – I have the tiniest pantry you can imagine – it’s a closet door width and the shelves are 12″ deep, so some creative organization was needed. Not much room in there – and it was definitely NOT enough when we had all the kids living at home.
A trip to the closest big box store (Walmart) and I came home with a few Rubbermaid containers – just to see how they would work out. They fit perfectly!!! I was doing the happy dance. So, back to the store for more – I cleaned them out since they didn’t have that many. I didn’t have nearly enough. Who knew it would be impossible to find these containers anywhere else? After 2 hrs. on the road and in 5 different stores, I came home empty-handed and did an internet search, only to find out that they were only available locally at Walmart – but I would need to go across town for more of them. Ugh! Clearly I was on a mission, so I made the drive across town that evening and purchases all that I needed to finish up the pantry, returned home and got it done. Doesn’t it look lovely?
The following day I went to the Container store and purchased the 2 organizers for all the bags and wrap boxes and found the cutest labels for my new containers. Score!!!
That and a command hook on the door for the aprons and I’m calling this project finished! Now I can find everything and it looks pretty as well.
Many more projects followed, including cleaning out the 2 linen closets, cleaning and organizing the drawers & cabinets in the master bath, dropping off a car load to Goodwill and painting a headboard. It was a productive week, just not a sewing week. I’d rather be sewing, which is exactly what I’m doing today!
I’ve been absent for a few weeks for a very good reason – our new little man arrived on Oct. 2nd and I’ve been doing what every grandma wants to do – rocking the baby!!! Did I mention that he’s a ginger (aka: red-head)? We prayed that he’d be a red-head. His big sister Livvy is a strawberry blonde.
Isn’t he the cutest little thing!!! Two weeks old now and a healthy 10 lbs. Both he and mama are doing well. The family is adjusting to new schedules and interruptions and less sleep and I think that Livvy has decided that he’s OK. LOL! We are so blessed to have yet another healthy grandchild to shower with love.
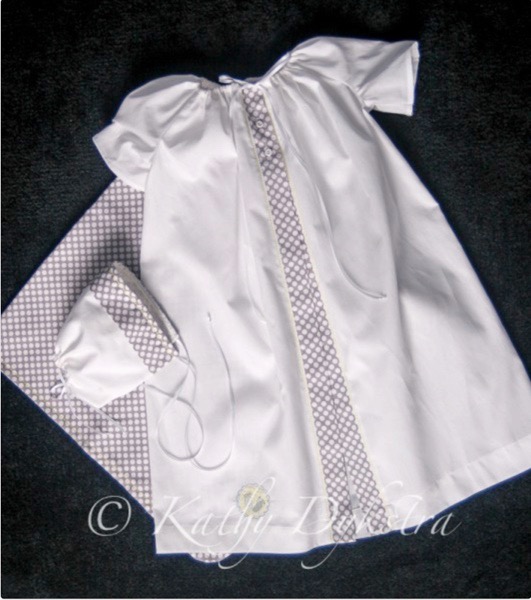
So, what have I been sewing since my last post? Not much! I didn’t want to start a big project just prior to his arrival since I knew I wouldn’t be able to get back to it right away. Instead, I chose to make some of the tiny gowns used by a couple different ministries that I sew for. The gowns go together rather quickly and are both needed and much appreciated. I thought I’d share pictures of the recently completed gowns.
These gowns and bonnets were completed for Caleb Ministries. The ministry headquarters are located here in town, and I am so thankful to be involved with them and to be able to share my love for sewing with such a worthy cause. They not only give the gowns to the grieving families, but the gowns and bonnets are paired with a blanket and booties as well as literature on grieving and contact information. That way they can get in touch with the ministry and participate in one of the Bible study groups with other moms that have lost their babies if they want to. They do a wonderful job reaching these women and have the boxes in all but one of the local hospitals as well as in many surrounding cities.
Sometimes they have special requests. Usually we do only white gowns and blankets, but one of the ladies had donated this blanket with a lavender edge on it along with lavender booties, so a gown with some lavender was requested.
This next gown was completed for another ministry that is located here – it is called Be Not Afraid. Our smocking guild (Smocking Arts Guild of America) does gowns for this ministry when we are contacted and asked for a gown. Frequently they know if the baby will be for a boy or girl and have an approximate size, so one of our members will take on the project. This is one that I did. As time permits, I like to add special touches to the gowns.
This gown was smocked in white and just a few bullion roses were added to the smocking at the neck and one on each sleeve. I added scalloped pintucks around the hem and used pink cording to fill the pintuck. With a stronger shade of pink cording, it shadows through as a pastel. the peak of each pintuck has another bullion rose.
These gowns shown above were completed in the week prior to Liam’s arrival. However, I have made many of these special gowns and thought I would share a few more pictures for inspiration/ideas. There are so many organizations that make these infant demise gowns and it can be challenging to come up with designs for boys. That is where I really like to use corded pintucks. I have done them with a dark ecru/gold color as well as with a stronger shade of blue and both work nicely with the batiste and shadow through as a soft ecru or a baby blue. For the groups that will accept gowns that open in the back, such as our Wee Care gowns that the SAGA organization makes, I like to add machine embroidery. I think they look a bit more masculine and they are definitely quicker to complete than the smocked gowns.
As you can see, I love to use my embroidery machine as well! Because there was not much room for embroidery on the front button gowns, I embroidered the blankets instead. Someone had knit the tiny ecru booties to match the blankets, so the ecru pintucks were a great choice to go in these special boxes.
To answer any questions regarding the cording that I use for the pintucks, I have tried 2 different sizes, and both work well. I have used the DMC pearl cotton for the cording in both size #8 as well as #5. The #5 is thicker and comes packaged much like embroidery floss while the #8 is on a spool. Both have limited selections, but I’ve been able to find colors that work.
My sewing machine has a tiny hole in the throat plate of the machine, positioned right in front of the pressure foot. I thread the cording through the hole and pull it behind the foot prior to starting my stitching. Use a 5 groove pintuck foot and a twin needle with lightweight thread (#60 weight heirloom thread) and shorten the stitch length to a 2.0 – the cording stays centered nicely due to being fed through that hole and it fills the pintuck and creates just a hint of color. Experiment with it and you’ll find all kinds of places that you may want to use this treatment.
That’s it for now. Maybe I’ll sew something this coming week that I can share in the next post.