Category Archives: Uncategorized

Christmas Inspiration

Today is the last day of October.  A chill is in the air as so many little ones don their costumes for an afternoon or evening of Trick or Treating. Tomorrow the realization that Christmas is just a few weeks away hits and  panic will set in for so many of us that want to have special hand-made Christmas outfits.  With that in mind, I thought I’d offer some sewing inspiration from my past creations.

For many years I did custom sewing for clients, and for several of those years I had clients with twins, which doubled the pleasure!  During this season of sewing, I determined that I should be taking pictures to save for my own personal reference – so, the photography was rather, well, tragic, to say the least.  You will need to enjoy the inspiration without critiquing the photography.  While my photography has improved over the years, I’m still a seamstress and not a photographer!

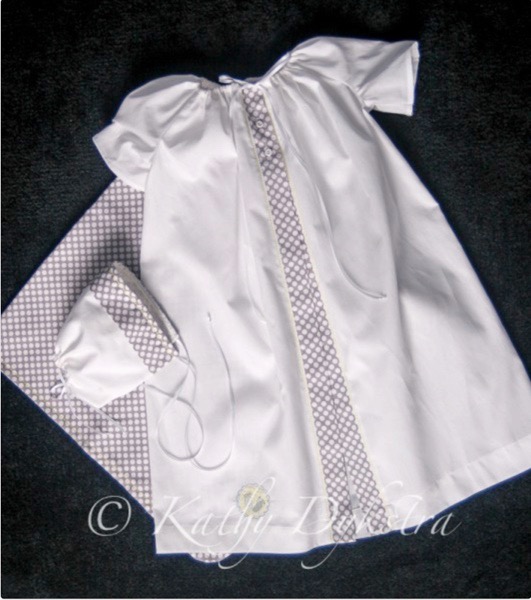
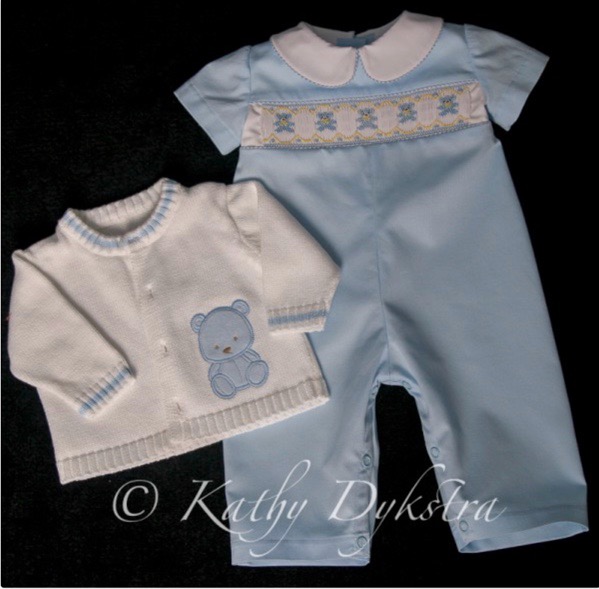
As many of you already may know, my favorite sewing is the fancy heirloom outfits, but they are also the least practical and least worn.  So, I’m showing a range of clothing from casual play clothes to exquisite heirloom to funky boutique and I hope there’s something that will inspire everyone.

Featherwale corduroy smocked with Little Memories “Ski Follies”.

Featherwale corduroy smocked with Little Memories “Duck the Halls”.

Striped cotton smocked with Little Memories “Ho Ho Ho”.

Heirloom satin batiste smocked with Little Memories “Santa’s Surprise” and added trees.

Featherwale corduroy smocked with Little Memories “Holiday Handymen”.

Hunter green velveteen smocked with “Nutcracker” from Creative Needle and “Joy” by Cherished Stitches”, using just the ornament design.

Black featherwale corduroy smocked with “Chimney Sweeps” – I cannot seem to locate my smocking design plate to share the designer.

The color on this dress is just tragic, so an explanation is needed.  The dress was a beautiful ecru colored cotton sateen with an organza collar and smocked with Little Memories “Bearly the Nutcracker”.

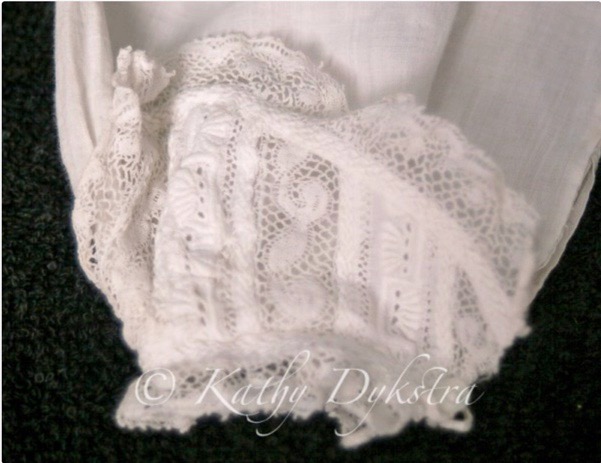
Stain batiste with shadow work embroidery.

Little brother’s satin batiste bubble with shadow work embroidery.

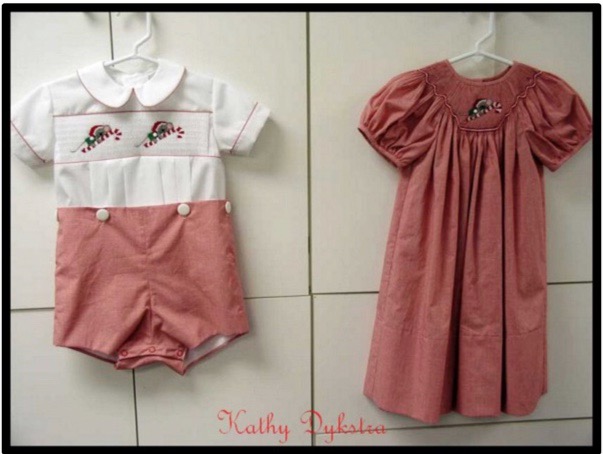
Bigger brother’s outfit.  Satin batiste shirt with cotton sateen shorts.  Honestly, the collars are even!

Satin batiste bishop smocked with “Holiday Bells” from Sew Beautiful magazine – holiday, 1992.

One of my personal favorites – the boy’s outfit made with satin batiste for the shirt and cotton sateen for the shorts and the girl’s dress is silk organza layer over satin batiste.  The smocking design is Stocking Stuffers” by Little Memories.

Silk organza makes the most beautiful bows!

Beautiful shadow work collars for twin boys – I don’t seem to have pictures of the complete outfits and don’t remember if these were button-on suits or if these were worn with velvet jon-jons.

Another bad picture with pretty outfits – satin batiste for the dress and shirt and cotton sateen for the shorts.  The monograms are from the Ellen McCarn monogram booklet.

Slightly more casual Christmas outfits – the shirt is broadcloth and the shorts and dress are micro check gingham smocked with Little Memories “Candy Cane Countdown”.

Broadcloth tops and featherwale corduroy smocked with Little Memories “All is Calm, All is Bright”.

Micro check gingham smocked with Little Memories “Northern Lights”.

Smocked top with original design.  Top is broadcloth and the pants are featherwale corduroy.

So much cuter “on”.

A modified version of “Sandpiper” from Australian Smocking and Embroidery magazine #88.

Boutique ruffled set made of white broadcloth and a touch of smocking at the neck and sleeves and a smocked red velveteen pinafore.  The pattern and smocking are an original design of mine.

Pattern is by Farbenmix called “Vida”.  This is such a fun dress for combining fabrics and trims and then adding machine embroidery!  Definitely a favorite fun dress of mine.

Even cuter “on”.  :)

Several a-line dresses.

This doesn’t exhaust my supply of Christmas outfits from the past, but more than enough for one post.  And now, I need to get on to smocking Christmas outfits for the 3 little girls since I only have Liam’s outfit finished.  So many ideas, so little time!

Happy Stitching…..

Kathy

This entry was posted in picture smocked dress on .

A Non-Sewing Week

What have I been up to lately???  Well, obviously I’ve still been helping with the new baby.  Nothing like having that sweetness to rock for a while!  They don’t stay little for very long.   Here’s our little man in his smocked outfit – I think it will fit for maybe another week!

Hubby was gone for a little over a week, so I decided that this was a good time for a couple projects.  Some of these are easier when you don’t have to clean up the mess at the end of the day!  My pantry was in desperate need of organization.  How on earth do pantries get to be such a mess???  So, a thorough cleaning out and throwing out of some outdated items.  Because we’ve gone to wheat free eating, so many other types of flours are necessary, and they all come in 1 lb. bags which are hard to control.  They were falling all over the place.  I need to say – I have the tiniest pantry you can imagine – it’s a closet door width and the shelves are 12″ deep, so some creative organization was needed.  Not much room in there – and it was definitely NOT enough when we had all the kids living at home.

A trip to the closest big box store (Walmart) and I came home with a few Rubbermaid  containers – just to see how they would work out.  They fit perfectly!!!  I was doing the happy dance.  So, back to the store for more – I cleaned them out since they didn’t have that many.  I didn’t have nearly enough.  Who knew it would be impossible to find these containers anywhere else? After 2 hrs. on the road and in 5 different stores, I came home empty-handed and did an internet search, only to find out that they were only available locally at Walmart – but I would need to go across town for more of them.  Ugh!  Clearly I was on a mission, so I made the drive across town that evening and purchases all that I needed to finish up the pantry, returned home and got it done.  Doesn’t it look lovely?

The following day I went to the Container store and purchased the 2 organizers for all the bags and wrap boxes and found the cutest labels for my new containers.  Score!!!

That and a command hook on the door for the aprons and I’m calling this project finished!  Now I can find everything and it looks pretty as well.

Many more projects followed, including cleaning out the 2 linen closets, cleaning and organizing the drawers & cabinets in the master bath, dropping off a car load to Goodwill and painting a headboard.  It was a productive week, just not a sewing week.  I’d rather be sewing, which is exactly what I’m doing today!

Until next time, keep on stitching….

Kathy

This entry was posted in picture smocked dress on .

A Few Little Gowns and a New Baby!

I’ve been absent for a few weeks for a very good reason – our new little man arrived on Oct. 2nd and I’ve been doing what every grandma wants to do – rocking the baby!!!  Did I mention that he’s a ginger (aka: red-head)?  We prayed that he’d be a red-head.  His big sister Livvy is a strawberry blonde.

Isn’t he the cutest little thing!!!  Two weeks old now and a healthy 10 lbs.  Both he and mama are doing well.  The family is adjusting to new schedules and interruptions and less sleep and I think that Livvy has decided that he’s OK.  LOL!  We are so blessed to have yet another healthy grandchild to shower with love.

So, what have I been sewing since my last post?  Not much!  I didn’t want to start a big project just prior to his arrival since I knew I wouldn’t be able to get back to it right away.  Instead, I chose to make some of the tiny gowns used by a couple different ministries that I sew for.  The gowns go together rather quickly and are both needed and much appreciated.   I thought I’d share pictures of the recently completed gowns.

These gowns and bonnets were completed for Caleb Ministries.  The ministry headquarters are located here in town, and I am so thankful to be involved with them and to be able to share my love for sewing with such a worthy cause.  They not only give the gowns to the grieving families, but the gowns and bonnets are paired with a blanket and booties as well as literature on grieving and contact information.  That way they can get in touch with the ministry and participate in one of the Bible study groups with other moms that have lost their babies if they want to.  They do a wonderful job reaching these women and have the boxes in all but one of the local hospitals as well as in many surrounding cities.

Sometimes they have special requests.  Usually we do only white gowns and blankets, but one of the ladies had donated this blanket with a lavender edge on it along with lavender booties, so a gown with some lavender was requested.

This next gown was completed for another ministry that is located here – it is called Be Not Afraid.  Our smocking guild (Smocking Arts Guild of America) does gowns for this ministry when we are contacted and asked for a gown.  Frequently they know if the baby will be for a boy or girl and have an approximate size, so one of our members will take on the project.  This is one that I did.  As time permits, I like to add special touches to the gowns.

This gown was smocked in white and just a few bullion roses were added to the smocking at the neck and one on each sleeve.  I added scalloped pintucks around the hem and used pink cording to fill the pintuck.  With a stronger shade of pink cording, it shadows through as a pastel.  the peak of each pintuck has another bullion rose.

These gowns shown above were completed in the week prior to Liam’s arrival.  However, I have made many of these special gowns and thought I would share a few more pictures for inspiration/ideas.  There are so many organizations that make these infant demise gowns and it can be challenging to come up with designs for boys.  That is where I really like to use corded pintucks.  I have done them with a dark ecru/gold color as well as with a stronger shade of blue and both work nicely with the batiste and shadow through as a soft ecru or a baby blue.  For the groups that will accept gowns that open in the back, such as our Wee Care gowns that the SAGA organization makes, I like to add machine embroidery.  I think they look a bit more masculine and they are definitely quicker to complete than the smocked gowns.

As you can see, I love to use my embroidery machine as well!  Because there was not much room for embroidery on the front button gowns, I embroidered the blankets instead.  Someone had knit the tiny ecru booties to match the blankets, so the ecru pintucks were a great choice to go in these special boxes.

To answer any questions regarding the cording that I use for the pintucks, I have tried 2 different sizes, and both work well.  I have used the DMC pearl cotton for the cording in both size #8 as well as #5.  The #5 is thicker and comes packaged much like embroidery floss while the #8 is on a spool.  Both have limited selections, but I’ve been able to find colors that work.

My sewing machine has a tiny hole in the throat plate of the machine, positioned right in front of the pressure foot.  I thread the cording through the hole and pull it behind the foot prior to starting my stitching.  Use a 5 groove pintuck foot and a twin needle with lightweight thread (#60 weight heirloom thread) and shorten the stitch length to a 2.0 – the cording stays centered nicely due to being fed through that hole and it fills the pintuck and creates just a hint of color.  Experiment with it and you’ll find all kinds of places that you may want to use this treatment.

That’s it for now.  Maybe I’ll sew something this coming week that I can share in the next post.

Happy stitching!

Kathy

This entry was posted in picture smocked dress on .

Some Machine embroidery

Since I’ve returned from convention I haven’t started any big projects.  Rather, I’ve been decorating some purchased garments for the grandkids while we all await the arrival of the newest little one – due any day/minute now.  I thought I’d share the results.

I should have photographed this first outfit on a light colored background. Oops!  This is a cute Janie and Jack jon-jon that was given for the new, soon to be here, little guy.  It needed a monogram.  Sadly, I cannot identify where this monogram came from as I didn’t include that information in my embroidery files.  Hopefully I’ll be doing better at that in the future.

This cute bubble was purchased – maybe Zulilly? – for next summer.  The plain bodice begged for something, so I embroidered it with the Sugar Spice font from Embroitique, which happens to be on sale right now!

The next embroidery victim is this dress from Old Navy.  It’s a cute dotted Swiss fabric, but rather plain.  The tights were what drove this purchase, so I wanted the embroidery to be something cowboy-ish.  I chose the Cowboy Appliqué Alpha from Planet Appliqué and added Olivia’s name with the Jackson Font from Embroitique.  I just happened to have an already stitched out star as well as a star button in my “stash” that seemed destined for this dress as well.  I know that Olivia has boots in several colors that will be adorable with this!

The next are sister outfits and I monogrammed them with the Iggy font from Apex Embroidery.  I loved how padded this stitch was.  This was a free font offered on Facebook.  I don’t believe that it is on their website.  If you’re not a FB fan of theirs, you’ll want to be for future free designs.

This last dress embroidery just didn’t want to happen.  When I hooped the dress, it apparently was getting caught somewhere and the result was that the different stitchings didn’t align properly.  I ended up un-sewing this, thankfully before all the satin stitching started.  After picking out all the (3x) placement, tack down, etc. stitches, I started over and removed my flat table on the big embroidery machine.  That was the solution to the problem.  It stitches out flawlessly.  The cute design is Reindeer with Bow from Digistitch.  It is such a cute design and perfect for winter or Christmas.  I chose a pink bow so that it didn’t look too Christmas-y and could be worn all winter.

So, the little ones each have something new and embroidered just for them.  Now to decide on what to stitch next.  Hmmm……..

Kathy

This entry was posted in machine embroidery on .

SAGA Convention Recap and Interesting Finds….

I have returned from the SAGA convention and had the most wonderful time! I was thrilled to be able to meet so many of the amazing SAGA teachers and see their beautiful handiwork in person – pictures just do not do justice to the beauty and detail of the projects.  Of course, I wasn’t able to meet every teacher, but hope to in the future.

The convention started out with a lecture by Kenneth King.  He is unbelievably talented, extremely knowledgable and very entertaining.  He walked us through the design process of creating a unique, couture garment and I think we were all in awe.  What an amazing couture designer!  If you ever get a chance to take a class from him, I know you wouldn’t be disappointed!

All the participants at the convention were so enthusiastic and I do believe that everyone had a wonderful time.  There were almost 600 Wee Care items donated, which was pretty fantastic!  I know that Wanda was thrilled.  She has done a great job organizing the Wee Care collections for many years.

I had the opportunity to meet so many people at the teacher showcase evening.  It was very well attended.  That evening I met Emily and Ashley of FrancesSuzanne blog.  What a delight they were!  They were attending the Leisl Gibson classes.  I hope that we will continue to see younger women excited not only about sewing, but also about smocking and heirloom sewing.  We need these young women to continue to carry on the love of sewing, smocking and all forms of handwork that we all love and appreciate.  I was able to visit with them a bit more at the banquet as they got the last seats available and were seated at our teachers table.  I thoroughly enjoyed visiting with them.

Market night was so much fun.  With no local stores that have heirloom supplies, it was a wonderful opportunity to not only support the teachers, but also to purchase supplies.  My favorite “find” of the evening was a new piping ruler!  Excuse the camera flash shadow – clearly I am not a photographer!

I have pictured the new ruler with my older ruler.  I know that we heirloom enthusiasts were so excited when the Darr Piping Ruler became available. It featured grooves to guide piping evenly while rotary cutting the seam allowance and included 4 different seam allowances.  Sadly, I was not as thrilled with this ruler as I’d hoped and did not use it much.  The grooves were larger than the tiny piping that we use for heirloom sewing and because of that, the covered cording would shift a bit during use resulting in an inaccurate seam allowance.  The shorter length was somewhat of a nuisance as well.

Imagine how thrilled I was to learn that Lyn Weeks came up with a new ruler that addresses these problems.  Not only is the ruler longer, which is a big plus, but the grooves underneath are the exact size for the tiny piping that is used on heirloom/smocked garments.  There are 2 grooves – one at 1/4″ and the other at 3/8″.  Actually, Lyn is so precise that the grooves are one millimeter less than the desired (1/4″ or 3/8″) seam allowance so that when you rotary cut at the edge of the ruler, it is exactly the correct measurement!!!  This is going to be a well used tool in my sewing room!!!  I was so excited about this new tool that I had to stand at Lyn’s booth and promote it to every passerby that I knew.  LOL!  Of course, that allowed me a bit of time to get to know Lyn as well – another enjoyable teacher that I hope to connect with again!

As long as we’re talking tools, I’ll share another one that Lyn was selling.  I already have this tool, but have not seen it readily available in heirloom shops.  This handy tool is a stainless steel awl (really, a book binders awl).

I have pictured the Clover plastic Hera marker with the stainless awl – I have used the pointed end of the Hera marker as an awl, as well as used a chop stick.  Both of these will work, but notice the difference in the pointed end of the stainless steel awl.  I first saw this stainless awl at a Debbie Glenn class and had to have one.  That pointed end is so sharp and can get right between the feet of the sewing machine and right up the the needle.  It is a wonderful tool to have if you do a lot of heirloom sewing by machine.  (would serve as a good self defense tool as well!  LOL!)

Another of my purchases was Lyn’s newest book – Tantalizing Tucks.  It joins my other “go to” books.  If I could only have 4 books in my sewing library, these 4 would be the books of choice.  I highly recommend all of them.  The techniques and information in each one of them is invaluable to any seamstress, but particularly to anyone that loves heirloom sewing.

My recap of the SAGA convention is that it was wonderful and I’m only sorry that I haven’t attended one sooner.  I certainly will be attending more of these in the coming years – it was an experience that has left me excited about sewing, smocking and pursuing even more excellence in the process.  The talent of teachers and students alike was very inspirational.

Now, off to get the rest of my housework finished so that I can get on to some more sewing…..

Kathy

This entry was posted in picture smocked dress on .

A Little Princess Top

I haven’t had much time for sewing this last week.  I’ve been busy with last minute preparations for the SAGA convention.  However, I did have the opportunity to stitch out an adorable Snow Princess on one of my Annalise tops.  I am thrilled with it and the little princess that will wear it immediately recognized it.

I had mentioned to Janet Gilbert that I was in the process of sewing my top up in the short sleeved version and would smock it after it was finished.  She indicated that her princess design would fit perfectly in the smocking area.  This sweet princess design is a new smocking design from Janet Gilbert  and should be available on her website later this week.  Of course, I was thrilled to be able to stitch the design in advance of publication.  Janet has several new designs scheduled to release this week.  I’m sure that each one is equally cute!  Thank you Janet!

Fortunately I had some sparkly rick rack in my stash in both pink as well as white.  I couldn’t decide on which one to use, so I used them both!  Because the points were the same distance apart and only the height of the peaks were different, I was able to use them together and the end result was not only interesting, but I think that it goes well with the snow theme.

This went along so well with the snowflakes in the smocking – which I added one strand of silver metallic thread for sparkle effect.

The Annalise top is one of my newest SAGA approved classes.  The top for the class is done in vibrant colors and has a cap sleeve.

Of course, the original pattern was called Temily and was in Australian Smocking and Embroidery magazine #80 several years ago.  The original pattern had a 3/4 length sleeve which is perfect for our mild winters in the south.  If you plan to be at the SAGA convention, I will have the samples with all 3 sleeve variations with me.

I have smocked this top with the different sleeve options so many times and in so many sizes now that I have lost count.  Each one seems to be my new favorite!  It is quick to smock, easy to wear and a little more trendy.  Both kids and moms seem to love it.  I am thrilled to be able to offer the wider range of sizes in the pattern teaching kits.

I’ll share some of the cute versions that I’ve created over the past several years.  I cannot chose a favorite – they are all favorites!

OK – I have to stop!  As you can see, this is really one of my favorite tops and with the sleeve variations can be worn all year long.  Different trims, smocking designs and themes allow this top to have unlimited creativity but still be a quick project.  I hope that this will encourage some young moms to learn this fine art of smocking!

On another note – I realized this week that I had made a significant mistake in my post with the beautiful vintage garments.  I had stated that one of the gowns was machine made.  Upon further investigation this week (under magnification) I realized that the perfect stitches in the gown were hand made.  Unbelievable that such precision could be achieved by hand.  I have corrected the post and am now even more amazed at the beautiful stitching of our sewing sisters of the past.

Until I return next week, happy stitching!!!

Kathy

This entry was posted in picture smocked dress on .

Sewing for Boys…..

If it weren’t for my favorite “boy” (aka: husband), you wouldn’t be seeing this post at all.  He has patiently and faithfully “fixed” all of my computer blunders over the years – and the blogging blunders have added yet another computer challenge for him to participate in.  I have a black thumb when it comes to growing things, and it is apparent that I have whatever the equivalent to a black thumb is in the computer/technology department as well.  I’m so thankful for his willingness to keep on “fixing” for me!

Very soon, we will be welcoming a new little boy in our lives.  Our second daughter and her husband are expecting the arrival of their second child early next month – a boy!!!  This will be our first grandson and we are very excited about adding a boy to the mix.  I’m sure that the 3 little girls (a sister and 2 cousins of his) will be big fans of his as well.  So, in anticipation of his arrival, I’ve made a few things for him that I hope will fit – even if for just a few weeks.  Unlike dresses, the boy outfits are less forgiving on fit – they have to fit through the crotch.

I have spent time the last several months looking for cute boy sweaters.  You know that I have a thing about sweaters and matching outfits.  I found a sweet sweater with a blue bear appliqué on it, so that was the inspiration for my first outfit for him.

I am hopeful that this will fit for more than a minute, though it is a NB size.  The blue pique was a perfect match and adding the smocked blue bears (Bears and Bows by Terry Collins) pulled it all together.

Upon finishing that outfit and realizing just how short the through the crotch measurement was, the next outfit that I made was the romper pattern by Chery Williams.  I made the 3 month size for Christmas and used red microcheck.   This smocking plate is called Pony Tales by Little Memories. This may also not fit for long.  I’m keeping my fingers crossed that it will fit at Christmas time.  At least it will fit for early Christmas pictures – maybe!

After completing 2 outfits and having concerns about the crotch/stride measurement fitting for long, I decided the next outfit would be a long pants jon-jon so that the buttons could be moved down for additional length when needed.  I redrafted a pattern of mine to give additional width to the pattern as well as made the pants long.  For this one I cheated and used an insert that I had purchased years ago from Belles et Beaux.  The fabric is fine wale corduroy.

We’re hoping for a little red head, so this would be perfect!  LOL!  And, the last bit of sewing that I’ve done for him is to make a pillow for the rocking chair in his room.

Of course, I have many more ideas for him as well as for the girls, but they will have to wait.  The SAGA (Smocking Arts Guild of America) convention is next week and I can’t wait to enjoy that event!  Hope to see some of you there.

Kathy

This entry was posted in picture smocked dress on .

Is it Fall Yet?

Well, it’s not really fall yet as our temperatures are hovering at around 90º.  But, I know it’s coming and wanted to have a few things ready for granddaughter #2 when the cooler weather hit.  So, the last week has been some fun sewing for her.

Of course, my go to pattern for some quick dresses is always the Children’s Corner “Lucy” pattern.  I had found several cute sweaters and wanted to make some jumpers that would match the sweaters.

The first outfit is a pretty pink and brown print corduroy.  It does have some lycra in it, which I don’t care for, but I do like the print and it was a perfect match to the sweater, so I carried on.  Isn’t the hoodie sweater so cute!  Because of the busyness of the print, I opted for a simple patch appliqué design from Lynnie Pinnie.  I think it works!

The next jumper is done in the feather wale corduroy and sports a cute cupcake appliqué from Bunnycup, which looked great with the cupcake sweater!

The last sweater was a bit more of a challenge to me because it wasn’t really a pink, but more of a coral.  Because I planned to shop only in my “stash”, all the fabrics that matched were a bit on the wild side.  A classic a-line didn’t seem appropriate for the wild fabrics, so I went with a European pattern company (Farbenmix) and used the Vida pattern – it is one of my favorites for a fun dress.  I have sized it down a little since the smallest size  would be a little too big yet.  This is a great dress to get creative with and can be done in some conservative prints with little extras on it, or it can go all out wild with lots of ribbons, trims and ruffles – which is, of course, the route that I took!

Because this dress is cotton, she can start wearing it now in our hot fall weather and then continue wearing it later on with a blouse or t-shirt and the sweater when needed.

Now I have to do some serious cleaning in the sewing room.  These Vida dresses have me pulling out the entire fabric, ribbon & rick rack stash and it looks as if a hurricane has blown through!  I need to get that cleaned up before I head out of town tomorrow.  Thankfully, I have also completed a couple of ready to smock tops that I will be able to smock while I’m gone.  So, hopefully my next post will feature some of the smocking that I love to do!

Until then, keep stitching…..

Kathy

This entry was posted in picture smocked dress on .

Beautiful Vintage Treasures

Today I thought I’d share some beautiful vintage treasures that are now residing at our house.  You know that you have the sweetest friend when you receive an unexpected parcel from overseas (UK) and inside are some beautiful vintage pieces.  Well, that has happened to me not once, but twice, from my wonderful friend, Genine!  Her generosity left me speechless!  I cannot keep these treasures to myself, so although I’m not an expert on vintage clothing, I thought I’d share pictures and what little bit I do know about them.

My first parcel arrived here a bit ago, and inside was a ladies nightgown – simple, but beautiful just the same.  I have no idea what the date of this gown would be, but I suspect early 1900’s just because the gown is completely constructed by hand.  The stitches are tiny and the thread extremely fine.  The gown is knee length and all the beautiful lace and detail work is on the bodice, so I’ll focus on showing the bodice.

I can only imagine the time it took to piece together all of these different laces.  On each side of the laces are the teeny, tiny pintucks, perfectly executed.

I am choosing to believe that this beautiful gown was for someone’s trousseau.  It is in remarkably good condition.  I did find a “repair” that was done to the gown and it just made me laugh.  What on earth was someone thinking by using red thread on a white gown???

Not only does the red thread repair stick out like a sore thumb, but the thread looks like rope compared to the fine thread used in the rest of the gown.  Note to self – things not to do when repairing.  LOL!

Then last week, much to my surprise and absolute delight, I received yet another parcel from the UK and inside were 2 of the most beautiful baby gowns.  They are both very different, but both equally spectacular.

The first gown is made by machine.  Sewing machines were not commonplace in homes until the late 1800’s, though they had been around and available earlier than that.  But, that does at least give a clue that the dress is probably dated not earlier than the 1890’s or after.  The style of gown is one that is difficult (for me) to date since it is a style that has been around forever.

Correction – while I thought that this gown was machine made, I was wrong – it is also completely hand made.  The stitches are so tiny and so perfect that my “mature” eyes believed them to be machine made.  Under magnification I could see that they were expertly stitched by a master!

The gown is 22″ long and has the most exquisite hand embroidery down the front of the dress and also on the fabric between the laces.  The fabric is the weight of a Swiss batiste or lightweight lawn.  Beautiful stitches executed with the skill of an accomplished embroiderer.  The design is so delicate and sweet!  I cannot imagine the hours that this embroidery took to complete!

The pintucks at the yoke are also completed by machine by hand, which I find pretty amazing, as they are only 1/16″ tucks and perfectly spaced.  The back of the gown also has pintucks, but they are 1/8″ tucks.

The neck and sleeves are finished with entredeux and gathered lace, and the sleeves are also set in with entredeux.  It is the tiniest entredeux that I’ve ever seen – even smaller than what we consider to be “baby” entredeux.

The other detail on this gown that I think is beautiful and have used on dresses that I’ve made is that the underarm has pleats at the seam.  The underarm seam has come out a bit, so I will repair that, but I wanted to show this sweet detail as well.  As you would expect, the seams are 1/8″ French seams.

This gown is in great condition, whatever the age of it is.  Such a beautiful treasure !  And if you think that this gown is stunning, the next one will blow you away!!!

This gown I believe to be older than the previous one.  It is completely made by hand.  It measures 36″ from shoulder to hem.  It is also constructed with tiny, 1/8″ French seams.  I believe it to be somewhere in the mid 1800’s based on the style of it with the wider, open neck and drawstring at the neckline and waist as well as the longer length, which was more popular in the 1800’s.  The drawstrings allowed for babies of different sizes to wear this gown for their baptisms or Christenings.  It also has some beautiful details.

The round yoke overlay/collar is constructed with laces and insertion.  I do believe that the insertion is hand embroidered.  The embroidery is not consistent enough to be machine made and the thread used for the embroidery is heavier than what I would expect – definitely not the delicate, fine thread that was used on the previous gown.  That said, it is still beautiful.  Where the lace pieces are attached to the embroidered insertion, the raw seam edges inside are caught down by the beautiful featherstitching.  On each side of the hand embroidery is what appears to me to be a drawn thread  treatment.   I am going to have to ask some of my friends that are experts in drawn thread to examine this and advise.  The outside of the lace overlay has a tiny bias band, again with featherstitching.  On the back side of the featherstitching, again, the edges are raw.

This same lace combination is seen as a sleeve cuff.  I don’t know what you call a cuff overlay that goes upwards.  :)  I hope someone will enlighten me about that!

The details are well though out throughout this gown.  I love the waistband area of the gown and the ties have the tiniest pleats where they attach to the gown, and although they are coming out (and I will repair), the pleats extend about 5″ from where they are attached and then release for the bow which would be tied in the back.  Unfortunately, my picture is a bit fuzzy.  It sure was difficult to photograph this white and capture the beautiful details.

The waist of the dress is attached with a technique that I’ve seen called many different things – cartridge pleats, gaging and French gathers.  This technique creates tiny, perfectly placed pleats that are sewn on the skirt portion and then the skirt is sewn to the dress.  Jeanie Baumeister has a wonderful post on that technique on her blog and also teaches this and other, similar techniques.

http://oldfashionedbaby.blogspot.com/2011/11/french-gathering.html

The same insertion embroidery and featherstitching is at the waist.

The sleeves have these same little pleats underneath the lace collar overlay.

I cannot thank my sweet friend Genine enough for sharing her wonderful vintage finds with me!  She has certainly blessed me with her generosity and these treasures have a special place in my home and will be a delight to share with students.  Of course, it does make me a bit sad to think that someone stitched for hours in anticipation of a new baby wearing these beautiful gowns that were made with much love, and now the gowns have been sold and are no longer in the family.  Knowing that,  I just can’t keep them to myself.  I have to share their beauty with others that will appreciate it.

As I guess you can tell, I am quite taken by these vintage treasures.  I plan to bring them with me to the SAGA convention and hope to glean more information about them from some of the expert teachers that will be teaching and sharing their knowledge.  I am looking forward to meeting many new sewing friends while I’m there.  If you have a love of sewing and embroidery of any kind, consider attending – it will be a wonderful learning event for all manners of sewing and embroidery with some of the best teachers.

If any of my readers have some insight about these gowns, either the techniques or an ability to date them, please comment.  I would love to find out more about them.

I hope to see you at the SAGA Sewcation in Florida!

Kathy

This entry was posted in picture smocked dress on .